With the model converted, it's close to being able to run in Xpress Insight.
Recall that earlier, when the
Xpress Workbench project was created, we deleted the initial set of default resources. This was to prepare the way to run the model as a native Mosel model from
Xpress Workbench. Now that the model is moving into
Xpress Insight, it is time to acknowledge
Xpress Insight's convention over configuration approach, and begin to develop its expected app directory structure.
To publish the model as an Xpress Insight app and run it:
- In the Xpress Workbench project tab, right-click on the Portfolio Optimization folder and select New Folder—name the new folder model_resources by over–typing New Folder.
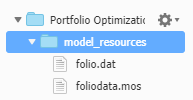
- Drag the folio.dat and foliodata.mos files from the root folder into the new model_resources folder.
One way to provide input data files to
Xpress Insight is to put them in a
model_resources folder.
Your project tab now looks like:

Project with a New model_resources Folder
You may see some other files at the top level, such as
foliodata.bim and
foliodata.zip—they are the compiled version of
foliodata.mos and an app archive respectively. More about this later, but for now, just ensure you have a
model_resources folder containing
folio.dat and
foliodata.mos.
- Choose from the main menu or press F5—wait a few moments and you will see a Process exited with code: 0 message in the Xpress Workbench console. If the console is not visible, press F6. If you see a different message, check that you have prepared the source and input files properly.
- Click the Publish to Xpress Insight icon
 . If prompted, select Create a new app and click Publish, otherwise wait a few moments for your app to be sent to Xpress Insight.
|
|
Note If the
Publish to Xpress Insight icon is not visible, click on the vertical tab on the right of the browser window labeled
Xpress Insight - this expands the
App panel.
|
Your app is compiled and sent to an
Xpress Insight instance - a message alert informs that the publishing event has occurred:

Xpress Insight Publish Success Message
- Click on the Open in Xpress Insight link in the message alert—you will be transferred to a running Xpress Insight instance.
- Click on the grey shelf of the Xpress Insight user interface and select your app's default scenario—it is called Scenario 1.
A pill representing
Scenario 1 appears on the grey shelf.
- Click on the Scenario 1 pill and choose Load from the drop-down menu.
The scenario's data loads.
- Click on the Scenario 1 pill again and choose Run.
The scenario executes.
Even without explicit user interface customizations, you can explore your model's entities via the Xpress Insight Entity Explorer.
In the original, pre-Xpress Insight model, the model's results were written to an output file—result.dat. Having moved the model into Xpress Insight, there is no need to remove the code responsible, as you may wish to run it again independently. However, Xpress Insight is aware of which entities are input entities and which are results entities and you can explore them together with other salient data items via the Entity Explorer.
© 2001-2020 Fair Isaac Corporation. All rights reserved. This documentation is the
property of Fair Isaac Corporation (“FICO”). Receipt or possession of this documentation does not
convey rights to disclose, reproduce, make derivative works, use, or allow others to use it except
solely for internal evaluation purposes to determine whether to purchase a license to the software
described in this documentation, or as otherwise set forth in a written software license agreement
between you and FICO (or a FICO affiliate). Use of this documentation and the software described in
it must conform strictly to the foregoing permitted uses, and no other use is permitted.


 . If prompted, select
