Initializing help system before first use

Publishing the Mosel Example from FICO Xpress Workbench to FICO Xpress Insight

We shall take the example file included in the installation and use that to test the connection between FICO® Xpress Workbench and FICO® Xpress Insight.
  1. Open Xpress Workbench, either on the desktop or on the FICO® Analytic Could (FAC).
  2. The link varies depending on whether you are using the Desktop or FAC version.
    • In the Desktop version, click CREATE INSIGHT (MOSEL) PROJECT. Select a location for the Project.
      Note In the Desktop version, the new Project will be named after the containing folder, so create a folder named Getting Started, and click OK. The new Project is loaded into Xpress Workbench.
    • On the FAC, click CREATE PROJECT and name the project, then click on the created tile.
  3. On the right-hand side of the central area (known as the artboard) are a set of vertically aligned tabs. Click on the tab labeled Xpress Insight to expand the panel, if it is not already visible.
    Note The artboard and other View Designer concepts are explored in View Designer Overview.
  4. Click the drop-down arrow in the top grey bar of the Xpress Insight panel and select Full Publish to Xpress Insight.
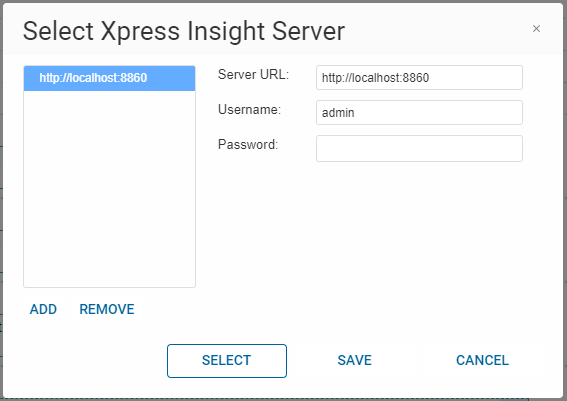
    A dialog is displayed to allow you to select the Xpress Insight Server you want to use.

    • The left pane lists the Xpress Insight Servers configured on your system.
      • To add a new server, use the ADD button under the left pane. If you are working locally and you have Xpress Insight installed on the same machine as Xpress Workbench, use the localhost server that displays in the list.
    • The right-hand side details the selected Server URL, and fields to enter the Username and Password of a valid account on that server.
      • You may use the admin user account (default admin) with the corresponding password (default admin123).
    • Click SELECT.
  5. If prompted, select Create a new app and click PUBLISH , otherwise wait a few moments for your app to be sent to Xpress Insight.
    Your app is compiled and sent to an Xpress Insight instance-a message alert informs that the publishing event has occurred:
    App Publish Success Message

    Xpress Insight Publish Success Message

  6. Click on the Open in Xpress Insight link in the message alert—you will be transferred to a running Xpress Insight instance (You may need to log in to Xpress Insight using the admin user account details admin and admin123.)
  7. Click on the grey shelf of the Xpress Insight user interface (labeled Click here to select scenarios) to open the Scenario Explorer. Select your app's default scenario (it is called Scenario 1) by clicking on it-A green tick appears next to selected Scenarios. Click CLOSE.
    A pill representing Scenario 1 appears on the grey shelf.
  8. Click on the Scenario 1 pill and choose Load from the drop-down menu.
    The scenario's data loads.
  9. Click on the Scenario 1 pill again and choose Run.
    The scenario executes. Three tabs (views) are displayed in the Xpress Insight page.

Edit the file and republish

We shall now verify you can make changes to the file in Xpress Workbench and publish the changes.

  1. On the left-hand side of the Xpress Workbench artboard is a single panel labeled Project. Expand the Client Resources folder to display the contents.
  2. Double click the file named Results.vdl to open it in Xpress Workbench.
  3. On the artboard, select the box containing the text "Insert VDL markup here."
    On the right-hand side of the artboard, the Attributes tab displays the attributes for the selected item.
  4. In the Text field at the top of the Attributes pane, delete the text and enter your name.
  5. Publish to Xpress Insight. Either:
    • Press Ctrl-Alt-P
    • Locate and click the Publish button in the Xpress Workbench top menu bar.

  6. Use the Open in Xpress Insight link to go back to Insight.
  7. Load your Scenario. Your name should be displayed in the top of the Results tab.

This exercise has confirmed the connection between your installed copies of Xpress Workbench and Xpress Insight, using the examples provided in the Xpress Workbench installation.

In the next chapter we walk through a workflow in which a business problem, formulated as a model, is transformed by stages into an interactive Xpress Insight app.

© 2001-2020 Fair Isaac Corporation. All rights reserved. This documentation is the property of Fair Isaac Corporation (“FICO”). Receipt or possession of this documentation does not convey rights to disclose, reproduce, make derivative works, use, or allow others to use it except solely for internal evaluation purposes to determine whether to purchase a license to the software described in this documentation, or as otherwise set forth in a written software license agreement between you and FICO (or a FICO affiliate). Use of this documentation and the software described in it must conform strictly to the foregoing permitted uses, and no other use is permitted.