
Creating a View for the Python Portfolio Example
Creating the Portfolio view
First, we shall create a form that enables a user to enter the preferred values. To create the view, in Workbench:- Click . Proceed through each page of the New View wizard before clicking Finish.
- In the first wizard page, enter the text "Portfolio" in the View Title field. This text is displayed as the view label by Xpress Insight and sets the default value for the Filename. Edit the filename to read foliodata.vdl, leave the View Group option at the default.
- Click Next to proceed.
- In the second wizard page, select Basic view and click Next.
- In the final wizard page, accept the default settings.
- Click FINISH. The new view is displayed on the artboard.
The generated foliodata.vdl file is displayed on the artboard. The containing Section element has two Row elements. Each Row has a single Column element. Click the Section element to select it.
- The Attributes panel is displayed on the right hand side of the artboard. Find the field in the Main pane of the attributes panel that is labeled Heading and edit the attribute to read ‘Portfolio Optimization’.
- On the artboard, in the top Row, select the Column. Edit the Attributes:
- Heading = “Input data”
- Size = 6
- Drag a Table from the Palette and drop it onto the Input data Column in the top Row. In the first page of the Table Wizard:
- Select Shares_Return.
- Click NEXT.
- In the CUSTOMIZE pane of the Table Wizard, select the Editable check box next to Estimated Return on Investment.
- Click FINISH.
- From the Palette, click on the Column element, then drag and drop it onto the top Row. Edit the Attributes:
- Heading = “Configuration”
- Size = 5
- Offset = 1
- From the Palette, click on the Form element, then drag and drop it onto the CONFIGURATION Column.
- Drag a Field from the Palette and drop it on the Form. Repeat this twice to add three Fields in total to the Form.
- Select the first Field and edit the attributes:
- Set the Entity to MaxHighRisk by clicking the search icon and selecting the option.
- Optionally, set the Label to “Maximum invest in risky share in %”.
 Note This step is not required—View Designer will adopt the entity alias annotations from the Python source file as labels if this value is not configured.
- Select the second Field and edit the attributes:
- Set the Entity to MaxPerShare by clicking the search icon and selecting the option.
- Optionally, set the Label to “Maximum investment per share”.
- Select the third Field and edit the attributes:
- Set the Entity to MinNorthAmerica by clicking the search icon and selecting the option.
- Optionally, set the Label to "Minimum investment into NA shares".
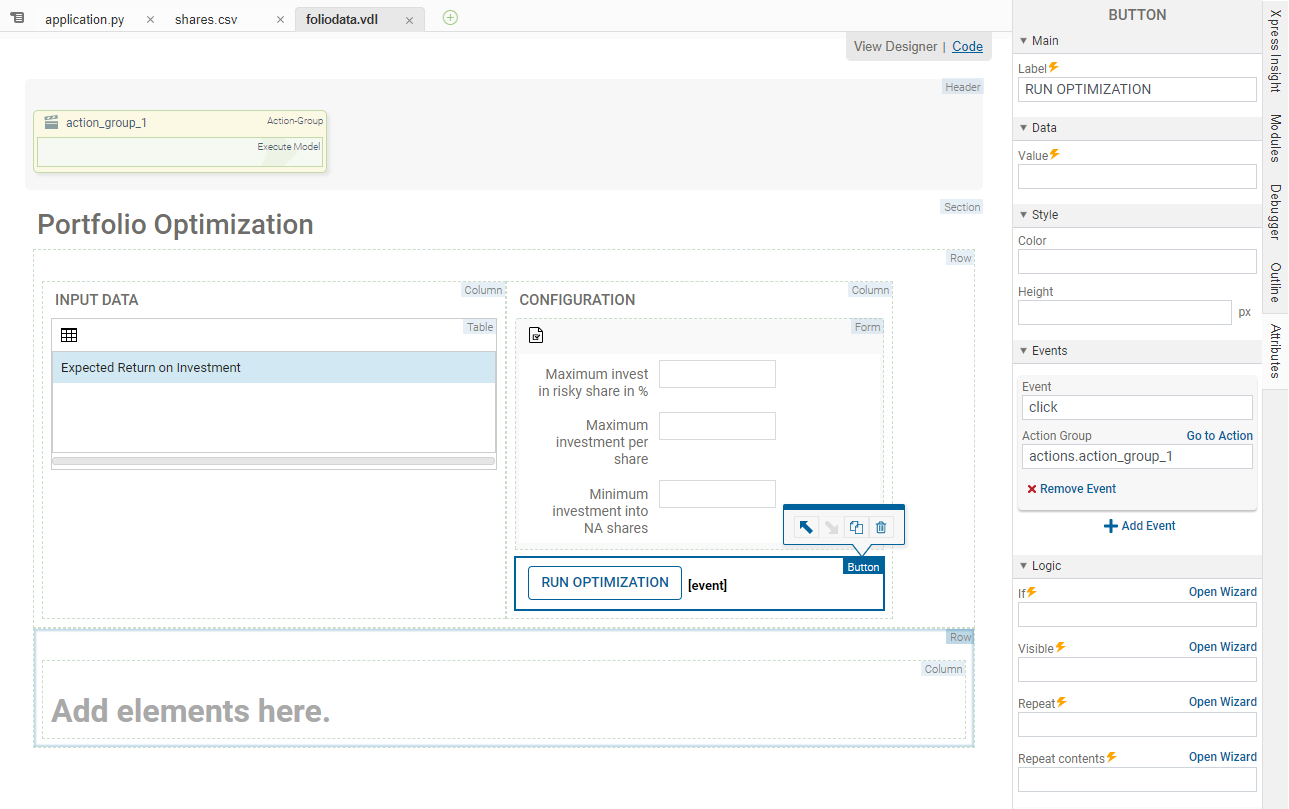
- We now need a way for the user to initiate the optimization. A button can be added to the form that will call the Run function. Before we add a Run button, we need to add the action that the button will execute. Click and drag an Execute Model element from the Palette > Actions group onto the Column on the artboard.
A new Header element is added to the VDL view, containing an action group. The action group is labeled Execute Model. The Execute Model > Attribute > Main > Mode value is set to RUN.
- In the Palette > Components group, click and drag a Button element onto the CONFIGURATION Column on the artboard. With the Button selected on the artboard, make the following changes:
- Edit Attributes > Main > Label to say RUN OPTIMIZATION.
- In Attributes > Events, click Add Event.
- In Attributes > Events > Event, select click.
- In Attributes > Events > Actions Group select actions.action_group_1.
- Select the Column in the lower Row and edit the Attributes:
- Heading = “Scenario Comparison”
- Size = 5
- Drag a Chart from the Components pane of the Palette and drop it onto the column. In the Chart wizard:
- Select Shares_fraction. Click NEXT.
- In the chart type pane, select BAR. Click NEXT.
- Click FINISH.
The Shares_fraction is added to the chart component as a chart series, and displays the alias configured in the Python source file ( Fraction used.)
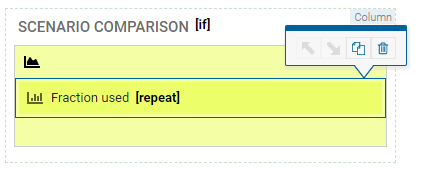
- Drag a Repeat component from the Logic pane of the Palette and drop it onto the Chart Series. In the Repeat wizard:
- Click the top option Repeat a chart series over each scenario on the shelf. The text box in the top of the wizard displays =s,i in scenarios.
- Click Finish.
- Drag a second column onto the lower Row. Edit the Attributes:
- Heading = “Results”
- Size = 5
- Offset = 1
- Save the file and publish the project to Xpress Insight using the Publish button.


In a later section, Binding the User Interface to Scenario Data, we shall add a table to display the results. This series of steps has created a basic Xpress Insight application that uses the Insight Python module to integrate with your Python file.
© 2001-2020 Fair Isaac Corporation. All rights reserved. This documentation is the property of Fair Isaac Corporation (“FICO”). Receipt or possession of this documentation does not convey rights to disclose, reproduce, make derivative works, use, or allow others to use it except solely for internal evaluation purposes to determine whether to purchase a license to the software described in this documentation, or as otherwise set forth in a written software license agreement between you and FICO (or a FICO affiliate). Use of this documentation and the software described in it must conform strictly to the foregoing permitted uses, and no other use is permitted.