
Managing Attachments using VDL Buttons
You can create, upload, edit, manage, and download both app and scenario attachments by triggering VDL Actions from an on screen button. For more, see
Attachment Management using VDL Actions.
A subset of Actions defined in the
Palette > Actions pane enable you to perform certain attachment operations using a vdl button. The Attachment Actions can:
- Create an attachment
- Upload app or scenario attachments
- Edit Attachment Properties—opens the edit app attachment dialog
- Manage attachments—opens a manage app or scenario attachment dialog.
- Download an attachment
Create an Attachment
Create an attachment in an existing vdl view.
- In the Palette > Actions group, click and drag an Create Attachment element onto the Section. In the CREATE ATTACHMENT Attributes panel:
- In the Main pane, select the Editor to use to open the attachment. The options are CTAttachmentEditor to open a decision tree editor, TextAttachmentEditor to open simple text files, or DecisionTableAttachmentEditor to open a decision table attachment editor.
- In the Options pane, set the Scope to either scenario or app.
- Optionally, set the Filename that will be assigned to the file.
- Optionally, in the Data > Scenario field, enter a number that represents the scenario to create the attachment in—This field also accepts a dynamic expression.
- Optionally specify the File-extension to append to the created file.
- On the artboard, select the Action Group element. In the ACTION-GROUP Attributes panel:
- In the Main pane, set the Name to createAttachment.
- In the Palette > Components group, click and drag an Button element onto a Column on the artboard. In the Button Attributes:
- Set the Main > Label value to Create Attachment.
- In the Button > Attributes > Events pane, click Add Event. Configure the Event:
- Set the Event to click.
- Set the Action Group to actions.createAttachment.
Edit an Attachment
Edit an attachment to an existing vdl view.
- In the Palette > Actions group, click and drag an Edit Attachment element onto the Section. In the EDIT ATTACHMENT Attributes panel:
- In the Main pane, select the Editor to use to open the attachment. The options are CTAttachmentEditor to open a decision tree editor, TextAttachmentEditor to open simple text files, or DecisionTableAttachmentEditor to open a decision table attachment editor.
- In the Options pane, set the Scope to either scenario or app.
- Optionally, set the Filename that will be used to locate the file to edit (you can use either a tag or a filename.)
- On the artboard, select the Action Group element. In the ACTION-GROUP Attributes panel:
- In the Main pane, set the Name to editAttachment.
- In the Palette > Components group, click and drag an Button element onto a Column on the artboard. In the Button Attributes:
- Set the Main > Label value to Edit Attachment.
- In the Button > Attributes > Events pane, click Add Event. Configure the Event:
- Set the Event to click.
- Set the Action Group to actions.editAttachment.
Edit Attachment Properties
Edit attachment properties to an existing vdl view.
- In the Palette > Actions group, click and drag an Edit Attachment Properties element onto the Section. In the EDIT ATTACHMENT PROPERTIES Attributes panel:
- In the Main pane, set the Filename that will be used to locate the file whose properties the user can edit (you can use either a tag or a filename.).
- In the Data > Scenario field, enter a number that represents the scenario to download the attachment from—This field also accepts a dynamic expression.
- In the Options > Scope drop down, select whether the scenario will be uploaded to the scenario or the app.
- Optionally, select the field to focus on when the editor is opened in the Main > Field drop down.
- On the artboard, select the Action Group element. In the ACTION-GROUP Attributes panel:
- In the Main pane, set the Name to editAttachmentProperties.
- In the Palette > Components group, click and drag an Button element onto a Column on the artboard. In the Button Attributes:
- Set the Main > Label value to Edit Attachment Properties.
- In the Button > Attributes > Events pane, click Add Event. Configure the Event:
- Set the Event to click.
- Set the Action Group to actions.editAttachmentProperties.
Upload an Attachment
Upload an attachment using an existing vdl view.
- In the Palette > Actions group, click and drag an Upload Attachment element onto the Section. In the UPLOAD ATTACHMENT Attributes panel:
- In the Main pane, set the Message value to an appropriate instruction for the user.
- In the Data > Scenario field, enter a number that represents the scenario to upload the attachment to—This field also accepts a dynamic expression.
- In the Options > Scope drop down, select whether the scenario will be uploaded to the scenario or the app.
- Optionally, add a Tag that will be assigned to the attachment.
- On the artboard, select the Action Group element. In the ACTION-GROUP Attributes panel:
- In the Main pane, set the Name to uploadAttachment.
- In the Palette > Components group, click and drag an Button element onto a Column on the artboard. In the Button Attributes:
- Set the Main > Label value to Upload Attachment.
- In the Button > Attributes > Events pane, click Add Event. Configure the Event:
- Set the Event to click.
- Set the Action Group to actions.uploadAttachment.
Download an Attachment
Download an attachment using an existing vdl view:
- In the Palette > Actions group, click and drag an Download Attachment element onto the Section. In the DOWNLOAD ATTACHMENT Attributes panel:
- In the Main pane, set the Filename that will be used to locate the file to download (you can use either a tag or a filename.).
- In the Data > Scenario field, enter a number that represents the scenario to download the attachment from—This field also accepts a dynamic expression.
- In the Options > Scope drop down, select whether the scenario will be uploaded to the scenario or the app.
- Optionally, add a Tag that will be assigned to the attachment.
- On the artboard, select the Action Group element. In the ACTION-GROUP Attributes panel:
- In the Main pane, set the Name to downloadAttachment.
- In the Palette > Components group, click and drag an Button element onto a Column on the artboard. In the Button Attributes:
- Set the Main > Label value to Download Attachment.
- In the Button > Attributes > Events pane, click Add Event. Configure the Event:
- Set the Event to click.
- Set the Action Group to actions.downloadAttachment.
Manage an Attachment
The
Manage Attachment option is normally added to an Action Group along with another Attachment Action to display a user instruction in the attachment manage dialog:
- In the Palette > Actions group, click and drag an Manage Attachment element onto an existing Attachment Action Group. In the MANAGE ATTACHMENT Attributes panel:
- In the MAIN pane, set the Message to an appropriate instruction for the user. For example, if the Manage Attachment Action is added to a Create Attachment Action, include any specific instruction the User will need to know.
 Note Be careful to set the Options > Scope attribute in the Manage Attachment Action to match the scope defined for the other Actions in the group.
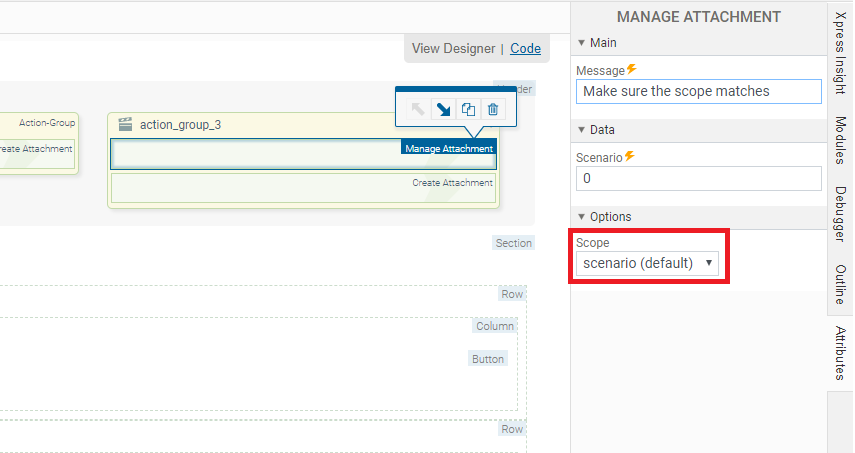
- In the MAIN pane, set the Message to an appropriate instruction for the user. For example, if the Manage Attachment Action is added to a Create Attachment Action, include any specific instruction the User will need to know.