
XAD resource editor
Create XAD Forms using a Drag and Drop Interface
The XAD Resource Editor can be used to quickly create a form layout for use in XAD Mosel applications. The layout, as defined by the user in the editor, is saved to file in a simple XML format and may then be read in using XAD's XADloadresource function. A full example for doing this from the XAD Editor all the way to a XAD Mosel model can be found on the example page.
This section contains the following topics:
- The Drag and Drop Toolbar
- The Form Edit Dialog
- The Properties Dialog
- XAD Groups
- The Event Dialog
- Tutorial Example
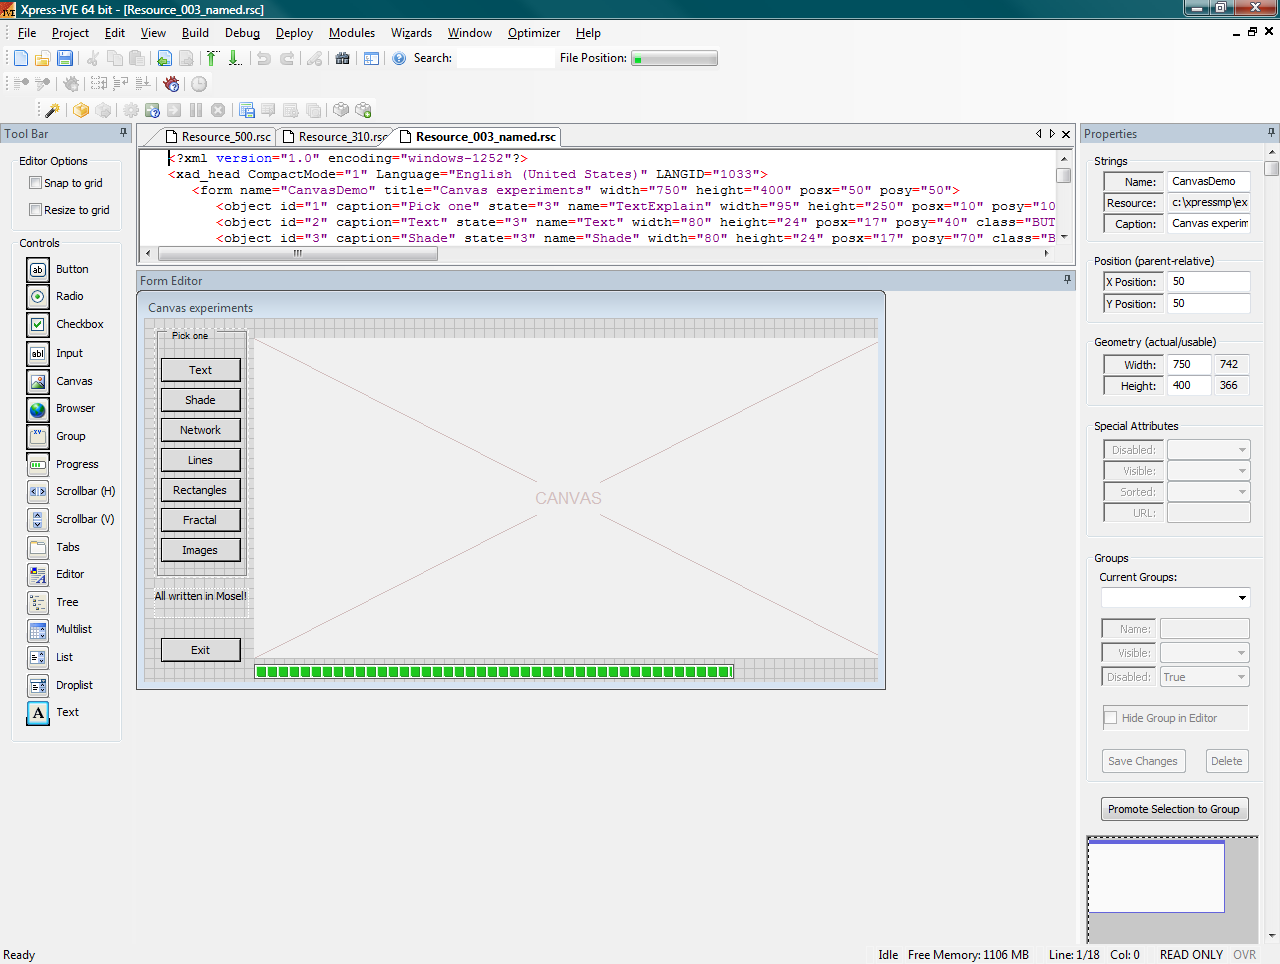
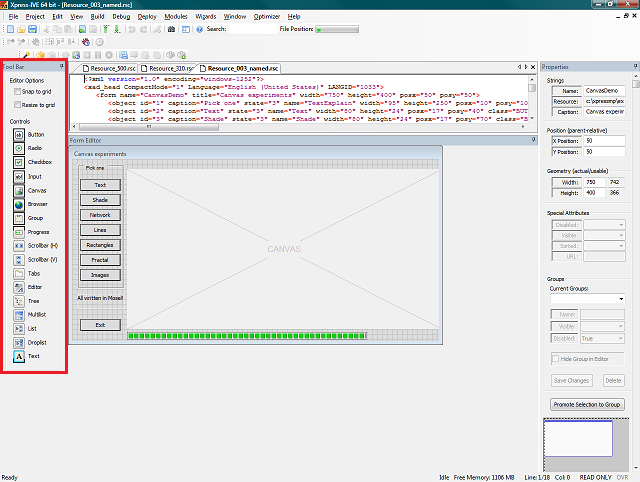
The XAD Resource Editor Form Edit Dialog
The Form Edit Dialog (FED) is used to construct a XAD window object containing XAD control objects through a drag and drop style interface. A form created in this manner may be loaded into a XAD Mosel model and the controls and objects on the form created from the resource file, rather than creating the objects programmatically with Mosel code.
The form itself may be resized through the usual Windows methods of selecting an edge or vertex and left-click dragging, or through an entry in the geometry input controls of the XAD Properties Dialog.
In a similarly Windows fashion the form may be moved around the central XAD editor pane by click-dragging on the form's title bar. Should you wish to move the top of the form beyond the top of the editor pane then you may do so via the form positioning control at the base of the XAD Properties Dialog. The latter method may also be useful if you are editing on a small screen, or with a particularly large form.
Note: To reposition the starting position of the form on the screen when first displayed via XAD Mosel you will need to alter the Position input control of the XAD Properties Dialog. Moving the form within the editor is simply for editing and has no runtime effect.
Once an object is placed on the FED and the properties altered you may wish to add events for the object to a Mosel model file, or create groupings that may be manipulated as one object within your Mosel code.
-
Adding Events: Event callbacks may be added to a current, or new, Mosel file by double left-clicking on the object you wish to add the event for. This will open up the Events Dialog where you may add, or navigate to, event callbacks within the Mosel code of the specified model. See the Event Dialog page for further details.
Note: In order to add an event callback to a file the file must be a valid Mosel model file. Specifically, it must contain the "end-model" line.
- Select Groups: To select a group of objects you may hold down Control whilst clicking on the individual controls. You can drag select a box around the desired objects (beginning the selection box anywhere on the form background). Or, if you have already created groups of objects you can select them via the Current Groups control in the XAD Properties Dialog.
- Delete Objects: In order to delete the currently selected object you must simply press the Delete or Backspace keys.
- Repositioning the Form: You may reposition the form within the editor pane by clicking and dragging as you would a standard Windows window; alternatively, you may use the FED Positioning Control in the XAD Properties Dialog.
XAD Resource Editor Groups
Grouping together objects within the XAD Resource Editor allows multiple objects to be moved, hidden or disabled simultaneously, both in the resource editor itself and, perhaps more powerfully, from within XAD Mosel code.
There are two distinct types of object groups:
- Temporary Groups:
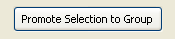
- used simply to move around several objects at a time and keep them at the same relative distances from each other. Temporary groups may be promoted to permanent groups by pressing the Promote Selection to Group button on the XAD Properties Dialog.
- Permanent Resource Groups (PRG):
- permanent group associations of objects. These can be manipulated within XAD Mosel code, hidden or disabled as a group, and allow individual objects to belong to multiple groups (see the 500selectiongroups.mos example discussed in the tutorial). This type of group is stored in the resource file itself and may be loaded in to XAD Mosel code to be associated with a particular group id (see: example).
Groups of objects may be moved by selecting any member object and click-dragging it in the same manner in which you would reposition an individual object on the Form Editor Dialog (FED).
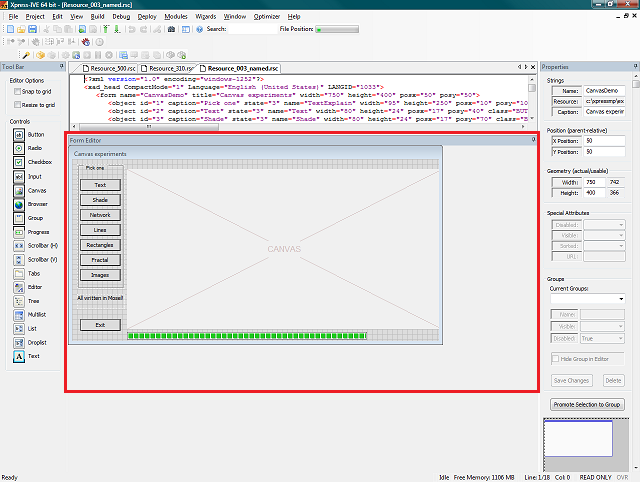
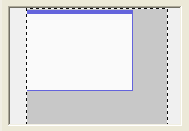
Any selected group of objects will have a bounding box (visible in the image at the top of the page) to display the extremities of the group. Within the FED this denotes the limits of movement of the group. Any attempt to click and drag the group's bounding box beyond the edges of the FED will result in no further movement beyond the FED edge.
Any PRG may be selected, updated or deleted using the Groups control section of the XAD Properties Dialog.
Groups Within XAD Mosel Code
Within XAD Mosel you may manipulate and use groups using the following routines:
- XADgroupgetid
- Used to retrieve the integer id of a group loaded via a resource file. It takes the arguments (groupName:string, XADWindowID:integer).
- XADgroupgetw
- Used to retrieve the integer pixel width of a group of objects. It takes the argument (groupID:integer).
- XADgroupgeth
- Used to retrieve the integer pixel height of a group of objects. It takes the argument (groupID:integer).
- XADgroupgetx
- Used to retrieve the integer x-position of a group of objects. It takes the argument (groupID:integer).
- XADgroupgety
- Used to retrieve the integer y-position of a group of objects. It takes the argument (groupID:integer).
- XADgroupsetpos
- Used to move the group in unison. The new position sent to the group defines the top left of the group bounding rectangle (remembering that screen-based coordinates have the top left as the origin). It takes the arguments (groupID:integer, xpos:integer, ypos:integer).
- XADgroupenable
- Used to enable or disable all members of a group. It takes the arguments (groupID:integer, enable:boolean).
- XADgroupsetvisible
- Used to show or hide all members of a group. It takes the arguments (groupID:integer, show:boolean).
Additionally, you may also create or destroy groups purely in Mosel code using the following procedures:
- XADgroupcreate
- By creating a set of integers (the XAD ids of those objects you wish to group) you can group them together using this routine. It returns the newly created group id. It takes the argument (objectIDs:set of integer).
- XADgroupaddmember
- Add an object to an already existent group. It takes the arguments (groupID:integer, objectID:integer).
- XADgroupremovemember
- Remove an object from a group. It takes the arguments (groupID:integer, objectID:integer).
- XADgroupdisband
- Remove all objects from a group. It takes the argument (groupID:integer).
Further details of these and other XAD routines may be found in the XAD Reference guide, xadref.pdf.
XAD Resource Editor Event Dialog
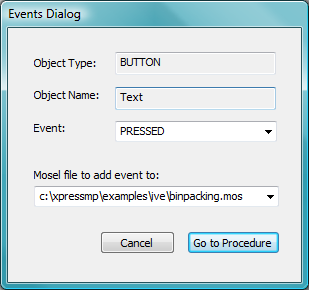
This dialog allows the user to quickly add in events for specific objects on the Form Edit Dialog (FED). It is opened by double left-clicking (or right-clicking, if you so desire) on the current object.
Options in the dialog:
- Object Type and Object Name:
- These are read-only and simply indicate the type of the object just selected and the name given to that object (see the XAD Properties Dialog to alter this).
- Event:
- The type of event to add. The selection list will change depending on the type of object currently selected. For instance a BUTTON object will not respond to WINDOW_OPEN events and so it will not appear in the list. A full list of events and object types can be found in the XAD Reference Manual, xadref.pdf, within the Xpress installation "docs" directory.
- Mosel File to Add Event to:
- Here you can select any open Mosel code file, choose to open another Mosel file, or choose to create a new Mosel file. The tutorial example creates a new Mosel file, but most commonly you will wish to add events to a current file.
- Cancel:
- Close the dialog without adding an event.
- Go To Procedure:
- This will open the selected Mosel file and, provided it is a valid file, add in the relevant callback and a small piece of code. This code will simply display a message to the effect of "Not yet implemented" and is simply meant as a placeholder until you add your own functioning code to the callback. Note: If the callback already exists in the file then you will be taken to that section of the code and no new code will be created.
Note: If you alter the name of the objects, window or the callback name itself once it has been created then the XAD code will not call that callback during code execution. The callback mechanism works on the assumption that the auto-generated callback will have the name structure "ObjectName_WindowName_EVENT". Should you wish for any reason to alter the name of an object during code execution then you may do so using the XAD procedure XADsetname(objectID:integer, newName:string), but great care should be taken when doing so.
The XAD Resource Editor Drag and Drop Toolbar
This toolbar contains the various controls which may be dragged and dropped on to the Form Edit Dialog (FED) as well as any general options specific to the editor.
The following controls may be selected for easier positioning and resizing of objects within the FED:
- Snap to Grid:
- When repositioning objects with the mouse the object's (0,0) point, or top-left, will position on the FED grid lines. The grid lines are spaced 10 pixels apart in both the vertical and horizontal axes.
- Resize to Grid:
- When resizing objects with the mouse the object's edges, in the direction of resize, will adhere to the FED grid lines. The grid lines are spaced 10 pixels apart in both the vertical and horizontal axes.
To add a control, simply left click on the desired object icon in the left toolbar and, keeping the left button depressed, move the object over the FED. Once the mouse cursor moves over a valid "drop" point the cursor will change from a circular "forbidden" symbol and you may release the mouse button. This creates the representation of the object at the "drop" point and you may then move or resize the control by left clicking and dragging within the centre or the edges of the control, respectively. This behaviour is much the same as standard Windows window behaviour.
The following controls may be dragged and dropped from the toolbar:
-
 Button:
- The standard Windows button control.
-
 Radio:
- The standard Windows radio button control. Note that grouping of multiple radio button objects does not cause them to act in a mutually exclusive manner. This must be done programmatically from within XAD Mosel.
-
 Checkbox:
- The standard Windows checkbox control.
-
 Input:
- The standard Windows text input control.
-
 Canvas:
- A canvas object used for drawing on from within XAD Mosel.
-
 Browser:
- An internet browser window. Set the initial page for the browser using the URL field in the properties dialog.
-
 Group Marker:
- The standard Windows group identifier box. Note that this has nothing to do with XAD Editor groups.
-
 Progress:
- The standard Windows progress display.
-
 Scrollbar (Horizontal):
- The standard Windows horizontal scrollbar control.
-
 Scrollbar (Vertical):
- The standard Windows vertical scrollbar control.
-
 Tabs:
Tabs:
- The standard Windows tabbing control. Multiple tabs may be added by separating the tab names with commas in the Caption field of the XAD properties dialog. To create groups of controls related to different tabs within the tab object, create multiple groups and then assign a SELECTION event to the object. Within the SELECTION event in the XAD Mosel code you are then able to hide and disable, or show and enable, the various groups relevant to whichever tab has been selected. Note: A maximum of three tabs within a tab control will display in the editor. This limit does not apply when running the actual XAD Mosel model.
-
 Editor:
- The standard Windows multiple-line text entry control.
-
 Tree:
Tree:
- The standard Windows tree display control.
-
 Multilist:
- The standard Windows multiple-column list control. The list may also have its sorted flag set by setting the Sorted field of the XAD properties dialog to true.
-
 List:
List:
- The standard Windows list control. Multiple items may be added to the list by entering a comma-separated list within the Caption field of the XAD properties dialog. The list may also have its sorted flag set by setting the Sorted field of the XAD properties dialog to true.
-
 Droplist:
- The standard Windows droplist control. Multiple items may be added to the list by entering a comma-separated list within the Caption field of the XAD properties dialog. The list may also have its sorted flag set by setting the Sorted field of the XAD properties dialog to true.
-
 Text:
Text:
- The standard Windows read-only text display.
The XAD Resource Editor Properties Dialog
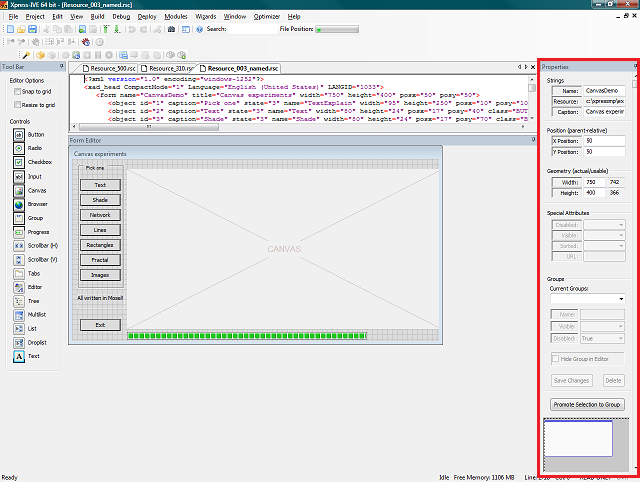
The Properties Dialog of the XAD Resource Editor is used to set the various window, object or grouping properies of items on the Form Edit Dialog (FED). In some cases, such as altering size or position, the attributes may be set using click-dragging within the FED.
The dialog itself is split up in to several sections, the behaviour of groups deserves a separate page and so is covered in more detail here:
- Strings
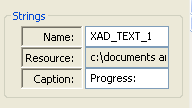
- Name: The internal name given to the object currently selected (used if retrieving the object id from XAD Mosel). This can contain any alpha-numeric character and the underscore character. It should be unique.
- Resource: A read-only field containing the name and full path of the resource currently being edited.
- Caption: If the current object has a text component (the window title in the case of the form) then you may enter it here.
- Position (parent-relative)
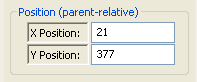
- X Position: The x position of the current object within the window; or, in the case of the window itself, the starting x position on the screen when the window is first drawn.
- Y Position: The y position of the current object within the window; or, in the case of the window itself, the starting y position on the screen when the window is first drawn.
- Geometry (actual/usable)
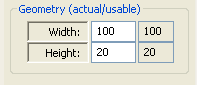
- Width: The pixel width of the current object and the relevant size of the usable area. The read-only "usable" text is currently only relevant for the window objects as they have a non-client border area.
- Height: The pixel height of the current object and the relevant size of the usable area. The read-only "usable" text is currently only relevant for the window objects as they have a non-client border area.
- Special Attributes
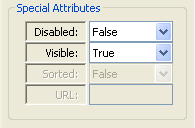
- Disabled: If you wish the object to be initially disabled (non-responsive to events and in many cases greyed out) then set this control to true. The default is enabled, the control set to false.
- Visible: If you wish the object to be initially hidden then set this to false. True by default. When set to false the object will be drawn with a small red X within the editor. To actually hide an object within the editor it must belong to a group and the group itself needs to be hidden using the Hide Group in Editor switch.
- Sorted: If you wish list objects to be sorted when first displayed then set this to true. False by default.
- URL: This string field is currently only relevant for the browser object and should contain the starting address (or home page, to use the common nomenclature) for the browser object when it is first displayed. It will not display anything within the FED object as this is not an actual browser window.
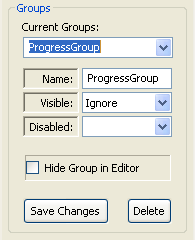
- Groups
- Current Groups List: The list of groups currently associated with the resource. Selecting from the list makes that group the current selection.
- Name: The name given to the group, either a default name or a user-given name.
- Visible: If you wish the objects within the group to be initially hidden (for instance if you are creating a tab object with multiple tabs) then set this to false. Ignore by default, meaning that the individual object settings for visibility will be honoured. When set to false the objects of the group will be drawn with a small red X within the editor. To actually hide a group of objects within the editor the group needs to be hidden using the Hide Group in Editor switch.
- Disabled: If you wish the objects of the group to be initially disabled (non-responsive to events and in many cases greyed out) then set this control to true. Ignore by default, meaning that the individual object settings for command response will be honoured. Note that this control will override any previous setting for the individual objects.
- Hide Group in Editor: Hide the currently selected group in the editor window. This is only for display in the editor as you are currently working on it and does not affect run-time display of the objects.
- Save Changes: Save the changes to the current group (such as a change of name or visibility status).
- Delete: Remove the current group from the groups list.
- Other controls
-
Promote Selection To Group: Clicking this button whilst having a number of objects selected (through shift-clicking, or via drag-selection) will promote that current temporary selection to a saved group which you may then edit via the Groups controls.
-
The FED positioning control: This displays the current position and size of the FED within the editing pane area. Should you wish to reposition a particularly large FED you may do so by click dragging the representation of the FED around the control surface. It will not allow you to move the FED to a position completely outside of the positioning control's field of view.
-
XAD Resource Editor Example
In order to demonstrate the use of the XAD Resource Editor and the associated XAD Mosel commands we will now look at the example "500selectiongroups.mos", in the XAD examples folder of the Xpress installation. This example not only covers the use of resources, but the manipulation of resource generated groups within Mosel code and the use of an object in multiple groups.
 |
+ |  |
⇒ |  |
To begin with load the "500selectiongroups.mos" file in to IVE and view the behaviour of the model when run.
In the example the tab object works by picking up the tab's SELECTION event, calling the relevant Mosel callback (Tabs_Window_SELECTION) and then setting the enabled and visible flags of the objects relevant to the currently selected tab. In this case the code required to do this is reasonably simple as we have setup groups of objects which we may hide or show with one command. Herein lies the power of object groups.
We will now look at the various sections of the example's Mosel code, before looking at the associated resource in the XAD Resource Editor. Finally, as a tutorial, we'll create a new resource containing a simple tab object and a few tab-associated controls.
The Mosel Code
The Mosel code has the following parts (ignoring those parts common to standard Mosel models):
- Load the window from resource:
Here we load the resource file in to the model. All resources equate to one XAD window and the return value of the function used to load the resource, XADloadresource, is the id of the XAD window object (id_win, in this case). - Retrieve the object/group ids:
Although we need not retrieve the object ids for all of the resource objects, if we wish to manipulate or respond to events for that object we must do so. When creating the resource each object/group will have been given a name (either the default "XAD_OBJECTTYPE_COUNTER", or set by the user) and it is this that we will use to retrieve the object ids.
Using the XAD functions XADgetid and XADgroupgetid we may retrieve the ids for objects and groups, respectively.
- Display the window:
This function opens the specified XAD window and displays all the associated objects. In order to only display/enable those objects relevant for the initially displayed tab we will need to setup the object states when the window opens. This is achieved via a WINDOW_OPENED event callback. - procedure Window_WINDOW_OPENED:
In this callback we need to setup the various states of the objects/groups belonging to each tab selection. There are six groups within the example, 3 relating directly to those objects displayed on each tab, and 3 relating to the buttons on the right hand side of the example.The right hand side buttons demonstrate that when the Button, Canvas or Text tabs are selected the relevant buttons are enabled or disabled. These differ from the groups setup for the objects in the tab control as each button may belong to more than one group (Group B, C or T depending on which tab selections they will be enabled for).
We intially have the "Button" tab selected and so within this callback we enable the id_group_button and id_group_B groups and disable the others.
Note: there are no events associated with the buttons in this example and so they will not actually perform any action if clicked.
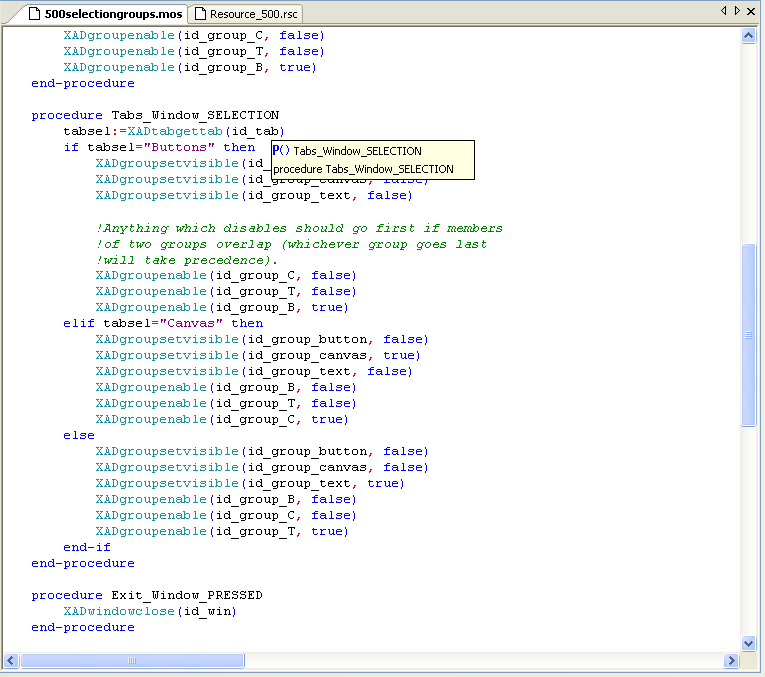
- procedure Tabs_Window_SELECTION:
This callback is in essence very similar to the WINDOW_OPENED callback, above. The difference being that we must check for the currently selected tab and then disable/enable and show/hide the relevant groups for each tab.As the comment in the code mentions, it is important to get the order of the commands correct if you are dealing with objects in multiple groups. Were the command order incorrect you may inadvertently enable and then disable an object (belonging to multiple groups) that you intended to be enabled.
Note: It is recommended to first disable all the groups you need to before finally enabling the relevant group or groups (as in this example).
- procedure Exit_Window_PRESSED:
When the "Exit" button is PRESSED this callback is called. All it does is cleanly close the id_win window so that the program closes in a user controlled and clean manner.
The Associated Resource File
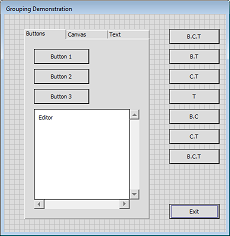
The resource file associated with the example, "Resource_500.rsc", can be found in the XAD examples directory alongside the Mosel file. Once loaded in to IVE you will be presented with the XAD Resource Editor and the representation of the XAD window and objects will be visible in the Form Edit Dialog (FED).
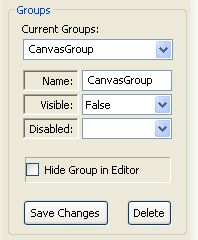
When initially loaded all of the objects within the tab will be visible. To hide a group of objects within he editor select the group from the XAD Properties Dialog Group drop-down list and then select the option to Hide Group in Editor.
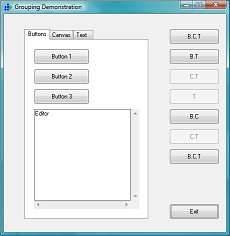
This behaviour can be used to quickly shift between group selections designed for use in tab objects. In this example we will hide the Buttons group and show the Canvas group:
- Select the group you wish to hide:
Here we've selected the Buttons group. It's currently visible in the editor.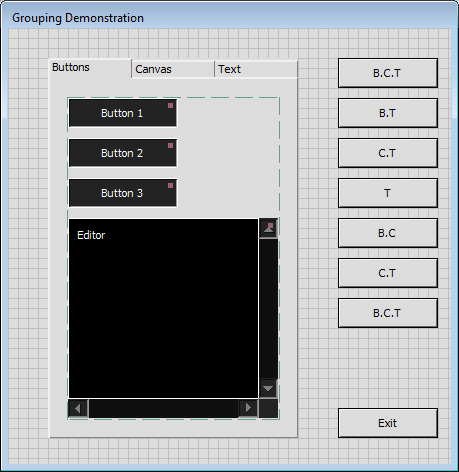
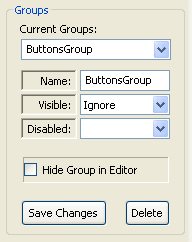
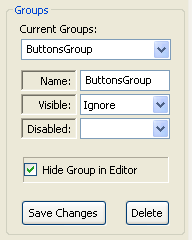
- Hide the Buttons group:
By selecting the Hide Group in Editor option we hide the Buttons group.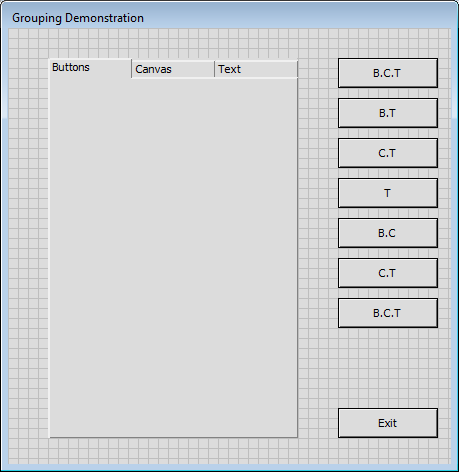
- Unhide the Canvas group:
By selecting the Canvas group in the drop-down list, and unselecting the Hide Group in Editor option, the Canvas group becomes visible in the editor.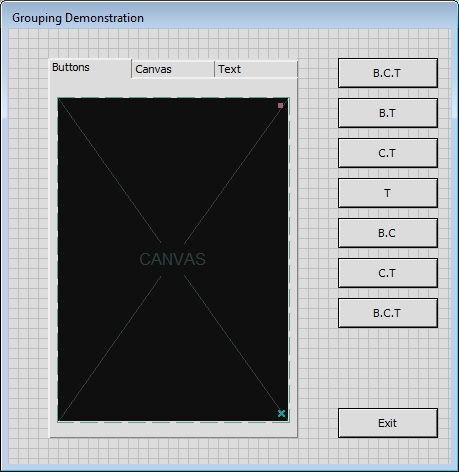
The events for the objects on the resource may be added, or navigated to, via the XAD Event Dialog. This is shown when an object, or the form itself, is double left-clicked.

As an example we will now navigate to the Exit button callback discussed earlier. To do so, firstly double click the Exit button in the FED to open the Event Dialog for the button. Once this is open we can navigate to the event callback in the following manner:
- Select the Event:
In this case we wish to select the PRESSED event, but were you adding a different event you could select any of the events offered to you in the drop-down list. - Select the Mosel File:
We wish to navigate to the event callback already set in "500selectiongroups.mos", but you could choose to add the event to any valid Mosel file in which you intend to load the "Resource_500.rsc". - Go to Procedure:
Once you've selected the event and file you wish click the button and you will be taken to the relevant callback in the file specified. In this case the callback already exists and so you should now see the XADwindowclose function call which forms the operational code of the callback.If you'd chosen to add a currently non-existent event callback to the file then the code part of the callback would contain the default "Not yet implemented" Mosel text output.
Creating a Simple Tab Example from Scratch
In this section we will use the Resource Editor to create a simple tabbing application for XAD from scratch, using the drag and drop features of the editor to layout the form and the Event Dialog to add in a few simple events.
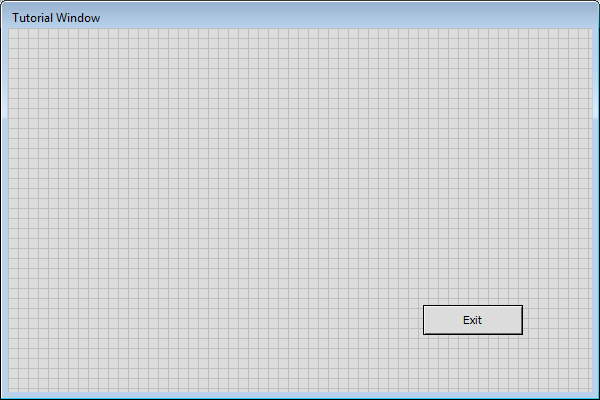
Firstly, create a new resource by selecting the New Resource option on the File menu. This will create a blank form in the FED of the default size (500x500).
Now we'll alter the form to the desired size and set its various attributes:
- Resize:
By clicking and dragging on any side or vertex of the form (or by entering the size in the Properties Dialog) resize the form to around 600x400. It's recommended that if you want a very specific size you set this via the Properties Dialog, otherwise using the mouse to resize can be quicker and easier. - Setup Strings:
Next you will need to enter a name for the form (XAD window) object. You may stick with the default "XAD_WINDOW_NUMBER" if you wish, but you may find it easier to maintain your Mosel program if you give it a more unique name. For this example you could enter "Main_Window".Enter a caption for the window (the title which appears in the form's top bar) via the Properties Dialog. For this example you could enter "Tutorial Window".
- Set the Window Position on Screen:
For this example we'll have the window open and display at half its own width and height from the top left of the screen. If you've set a form width and height of 600x400 then set the "X Position" to 300 and the "Y Position" to 200.
Next we'll add a button object for closing down the program once it's started. This will involve adding the button itself via the drag and drop editor, creating the new Mosel model file and adding the PRESSED event to close the window in the Mosel code:
- Adding the Button Object:
Click and drag a button object from the drag and drop toolbar on the left-hand side of the editor. Once your mouse cursor moves over a "droppable" area of the newly created form you can release the mouse button; this will create a button at the position of the mouse cursor. To refine the position of the button you may left-click and drag it within the form, or you may enter the position in the Properties Dialog, as we did with the main form. In this example we'll place the button towards the bottom right of the form. - Modify the Button Attributes:
As with the main form we should give the newly created button a more descriptive caption and, if desired, a more unique name. In this example we will mark the button as the "Exit" button and give it the name "Exit". - Add a PRESSED Event:
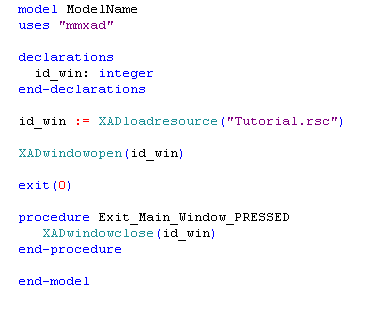
To make the button function when pressed we need to add an event via the Event Dialog. With the "Exit" button selected (its attributes will be visible in the XAD Properties Dialog), double left-click on the button to open the Event Dialog. Select the PRESSED event, as we want this callback function to be called when the button is pressed, and make sure "Create a new file" is selected as the Mosel file to add the event to. Now click "Go to Procedure" and enter a location and name for your new Mosel file. For this example we'll call the new Mosel file "Tutorial.mos".You should now see the newly created Mosel file with the Exit_Main_Window_PRESSED procedure inserted. As we want the procedure to close the window replace the default code with XADwindowclose(id_win) as in the original example above.
In this instance, as we've created a new Mosel file, the code to load the resource and assign this particular resource to the id id_win isn't yet present. Had we added this to an already existent Mosel file then we would of course close the window of whatever XAD id had been associated with the resource.
To create a functioning application we now need to add in a little connecting code to load this particular resource file and open the associated window:
- Enable XAD Code Usage:
As we'll be using the XAD Mosel module we'll need to add the line "uses "mmxad"" to the Mosel code. - Declare the Window ID:
Within the declarations section of the Mosel code you will need to declare the id of the XAD window we will associate with the resource. In this case we're calling the id id_win, as above. All ids are simply integer values and therefore we must add the line "id_win: integer". - Load the Resource: To associate a resource with an id the resource (and thus its associated objects) are loaded using the XAD function "XADloadresource". This function returns the integer id it has associated with the loaded resource and we assign this to id_win.
Note: if your Mosel code file and resource file are saved in different folders then you will need to specify a path to the resource file in the argument to "XADloadresource".
- Open the Window and Begin Execution:
In order to hand control of the application to the "Main_Window", id_win, we need the program to display the window and associated controls. To do so use the XAD function "XADwindowopen(id_win)". - Exit the Program:
To cleanly exit and end the main section of the code we now add the "exit(0)" command to the Mosel code. - Cleanup the Code:
Whenever a new Mosel file is created in IVE there may be default sections that are inappropriate to your program. In this case we do not require the reference to "mmxprs", the "parameters" section or the Mosel "writeln" code and so they can be removed.
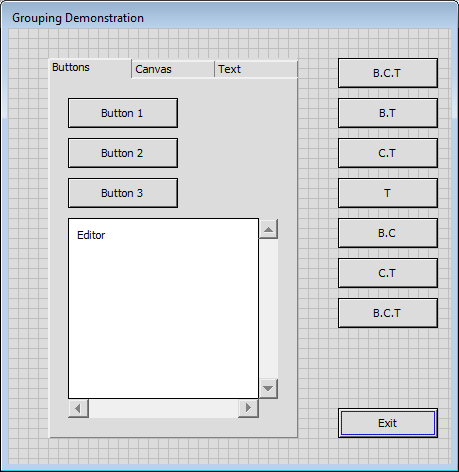
The Mosel code and resource should now look like similar to the images below and you should be able to run the application in IVE. Try running the program and notice that we can exit using the button and event we've created.
Finally, we'll add the tab object with a couple of XAD objects associated with each tab:
- Add the Tab Object:
In the same manner in which you added the button, previously, add a tab object to the form. Again, in the same manner as the button, give it the name "The_Tab" and position it towards the top left of the form. Now, in the same manner as you resized the form object at the start of the tutorial, resize the tab object to fill the form to the right of the "Exit" button. - Create Multiple Tabs:
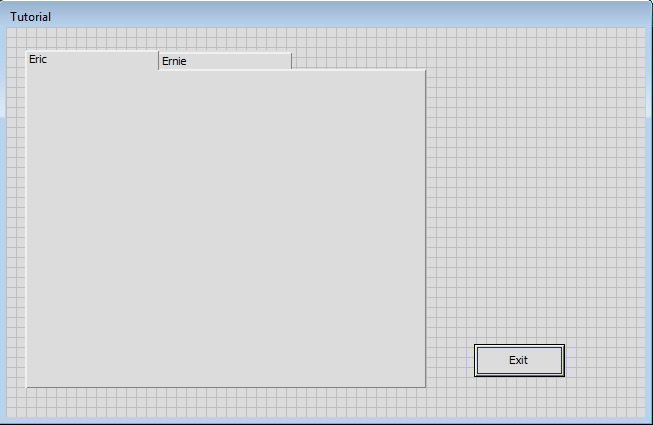
Instead of having a single caption or title, the tab object has tab captions to the top of each tab. These are added in the same manner as the caption added to the "Exit" button, but with the tab captions delimited by the comma character.In the XAD Properties Dialog enter "Eric,Ernie" in the Caption field. This creates two tabs on the tab object. A maximum of three tabs will be visible on the FED, although you may enter as many comma-separated tab caption entries as you wish in the Caption field.
The resource editor should now appear similar to the following:
- Add Objects for Each Tab:
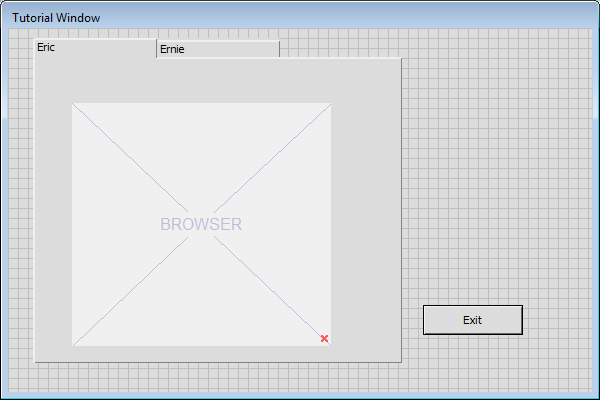
On each tab we want different objects to appear. In this example we will create canvas and text objects on the "Eric" tab and a web browser on the "Ernie" tab: - In the same manner as the other drag and dropped objects, add a browser object to the form and reposition/resize it to sit over the tab object. You will need to drop the browser on a section of the form itself.
- Next set a name for the browser, "Browser" in this example, and set the URL field to the web page you wish it to open on when clicked, www.fico.com in this example.
- All objects associated with a tab should be grouped together. For the "Ernie" tab the group consists of the single browser object, "Browser".
Whilst holding down the Control key left click on the browser object. This creates a selection group.
To make this a permanent group, for use in XAD Mosel code, you now need to promote this to a group using the Promote Selection To Group button of the XAD Properties Dialog. This creates a group called "Group_1".
Rename this newly created group to something more unique, such as "Group_Ernie" and set the Visibility to False and Disabled to True as initially the "Eric" tab will be visible. Click "Save Changes" to save the group updates. All of the commands to rename and update groups are to be done via the Groups section of the XAD Properties Dialog.
Now hide the browser object in the editor so that we can add the "Eric" tab objects. With "Group_Ernie" selected click the "Hide Group in Editor" checkbox on the XAD Properties Dialog.
- For the "Eric" tab add the canvas and text objects in the usual drag and drop manner. For the sake of keeping the Mosel example code simple in this example the canvas object will simply be blank. The text object may contain any text you wish and may be entered via the Capion field of the XAD Properties Dialog. In this example the objects have been given the names "Eric_Canvas" and "Eric_Text".
By Control clicking the "Eric_Canvas" and "Eric_Text" objects create another group called "Group_Eric". This group should be visible and enabled.
- Add the SELECTION Event Callback:
Now that the groups of objects are setup we should add the tab SELECTION event callback to the Mosel code so that something actually happens when the tab with focus is changed. Double left-clicking on the "The_Tab" object open the Event Dialog, select the SELECTION event and the Mosel file you created previously and "Go to Procedure". - Associate Code-Referenced Objects with Resource Objects:
Any objects, or groups, created in the Resource Editor that you wish to manipulate in the Mosel code must have an associated id. In this example we will reference the "The_Tab" object and the two groups "Group_Eric" and "Group_Ernie". To associate an integer id with these objects use the two XAD Mosel functions XADgetid and XADgroupgetid, both of which take the string name of the object or group and the id of the XAD window it is associated with, id_win in this case. - Add the Tab Selection Handling Code:
When either of the two tabs is selected we want to show and enable the objects associated with it and hide and disable those objects not associated with it.Within the The_Tab_Main_Window_SELECTION procedure use the XAD Mosel function XADtabgettab(id_tab) to retrieve the string name of the currently selected tab. Compare this name to the two tab names "Eric", or "Ernie" and enable/show or disable/hide the two groups as appropriate using XADgroupsetvisible and XADgroupenable.
This should result in the following resource and Mosel code:

You have now created a very simple working example using the resource editor, groups and events. Provided you have saved all changes to the resource file you should now be able to run the example and switch between the tabs successfully.
© 2001-2024 Fair Isaac Corporation. All rights reserved. This documentation is the property of Fair Isaac Corporation (“FICO”). Receipt or possession of this documentation does not convey rights to disclose, reproduce, make derivative works, use, or allow others to use it except solely for internal evaluation purposes to determine whether to purchase a license to the software described in this documentation, or as otherwise set forth in a written software license agreement between you and FICO (or a FICO affiliate). Use of this documentation and the software described in it must conform strictly to the foregoing permitted uses, and no other use is permitted.