Initializing help system before first use

Editing the View layout

Elements on the artboard can be re-ordered in three main ways:
  • By adding new layout elements, such as Sections, Columns, and Rows.
  • By clicking an element placed on the artboard and dragging it to the new location.
  • By using the action toolbar.

The action toolbar is displayed when an element on the artboard is selected. You can also duplicate or delete the element using buttons on this menu. The apparent behavior of the two move buttons depends on the level of the relative items. An element can move within the confines of its parent container—The move buttons are disabled if an element would move outside these confines.
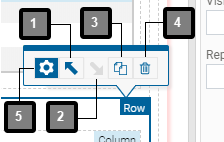
For example, two Columns on the same Row will move within the parent Row, but not move outside the Row. Two Rows can move within the parent Section. The apparent behavior may display the moved element either left or right of the adjacent item—as in the case of the two Columns—or above or below it—as happens when moving Rows.
Item Description
1 Move before any preceding adjacent element
2 Move after any following adjacent element
3 Create a duplicate immediately after the selected element
4 Delete the selected element
5 Open element wizard (re-entrant tool—see note)
Note The re-entrant tool will only be displayed when an appropriate element, that contains content that can be generated using a wizard, is selected on the artboard; These elements include: the Text element.

To Edit the View Layout:

  1. The View contains more elements than we need. Select the Portfolio element on the artboard by clicking it. Press the Backspace or Delete key on your keyboard to delete it, or use the Delete option in the action toolbar.
  2. Add a section onto the Page. To add a section to an open View:
    1. If the Palette is not displayed, click the Palette tab to open the pane.

    2. In the Layout group, click and drag the Section element onto the artboard.

    For more, see Using the Palette.

  3. Select the Section element on the Page element by clicking it.
    1. In the Attributes pane, edit the Heading attribute. Enter the text "Welcome to Portfolio Optimization" in the Heading attribute box.

    2. Drag the slider, displayed below the Heading level field, to the left until the figure in the field displays "1".
  4. Add a Row in the Section. In the Layout group, click and drag the Row element onto the artboard, and drop it on the text “Add a Row here”. The new Row is added to the bottom of the section.
  5. Add a Column to the Row. In the Layout group, click and drag the Column element onto the artboard, and drop it on the Row. Repeat this step to add a second column. Note that if you try to drop the second Column onto the first, the Column on the artboard highlights red—This is prohibited in View Designer because this action would create a badly formatted .vdl file. View Designer also highlights errors in formatting created in the code editor. For more see the later section on Soft Code Validation in the View Designer.
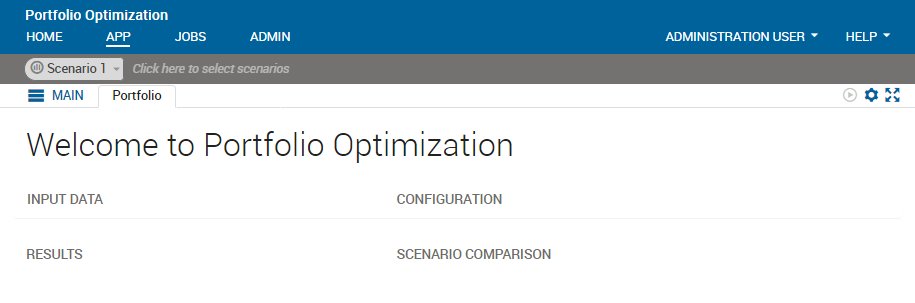
  6. Select the first Column. In the Attributes pane, make the following changes:
    1. Enter "INPUT DATA" in the Heading attribute box.
    2. Drag the slider adjacent to the Heading level field to the left until the figure in the field displays "4".
    3. Set the Size attribute to 6.
    Note Remember to set the Size attribute. Each Column will default to occupy the full width of the Row if you do not specify a size, which will make each column look like it is a separate row.
  7. Select the second Column to the artboard. In the Attributes pane, set:
    1. Heading to “CONFIGURATION”
    2. Heading level to 4
    3. Size = 6
  8. Add a second Row after the first by dragging a Row element from the Palette onto the Section on the artboard.
  9. Add a Column to the new Row. In the Layout group, click and drag the Column element onto the artboard, and drop it on the Row. Select the Column. In the Attributes pane, set:
    1. Heading to “RESULTS”
    2. Heading level to 4
    3. Size = 6
  10. Add a second Column to the new Row. In the Layout group, click and drag the Column element onto the artboard, and drop it on the Row. Select the Column. In the Attributes pane, set:
    1. Heading to “SCENARIO COMPARISON”
    2. Heading level to 4
    3. Size = 6
  11. Open and run foliodata.mos to load all Mosel entities. Click Run > Run foliodata.mos or press Ctrl+F5.
  12. Publish your app to Xpress Insight and examine the user interface. Click the Xpress Insight tab on the rightmost side of the artboard to open the pane, then click the drop-down arrow on the far right of the top bar.

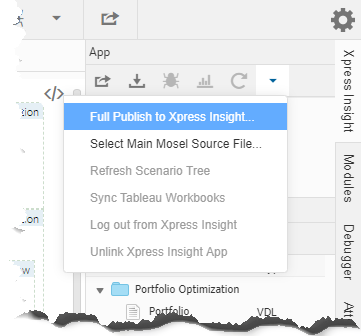
  13. Enter the details for the Insight Test Server. If you have already configured the server URL, enter your password, then Publish. For more on Publishing to Xpress Insight, see the Insight Developers Guide.
    Note This publishing method is also known as a full publish.
When publishing to Insight, Workbench compares the dates of client resources, model resources, and attachments against the last modified date of the local app archive file and only includes files which have been modified since the previous publish.

The user interface now contains the Welcome to Portfolio Optimization message.
Tip Layout elements are used to organize page content. For smaller pages, you might only use one section, but for larger pages, it is a good idea to separate your page content into several sections to demarcate areas of your app.
This is a simple initial static view that is not yet linked to model data.

© 2001-2020 Fair Isaac Corporation. All rights reserved. This documentation is the property of Fair Isaac Corporation (“FICO”). Receipt or possession of this documentation does not convey rights to disclose, reproduce, make derivative works, use, or allow others to use it except solely for internal evaluation purposes to determine whether to purchase a license to the software described in this documentation, or as otherwise set forth in a written software license agreement between you and FICO (or a FICO affiliate). Use of this documentation and the software described in it must conform strictly to the foregoing permitted uses, and no other use is permitted.