
FICO Xpress Installation
Topics covered in this chapter:
- Introduction
- Community License
- Obtaining a Full License File
- Downloading the Installation Packages
- Installing Xpress on Microsoft Windows
- Installing the Community License
- Installing a Static License
- Installing a Floating License
- Post Installation Tasks
- Installation on Linux or Unix
- Installation on macOS
- Manual Installation
- Patch Installation
- Installation of the R and Python packages
Introduction
This document describes how to install the FICO Xpress Optimization Suite and the licensing configuration options for the software.
For installation instructions pertaining to FICO® Xpress Insight, please see the Xpress Insight Installation guide.
Note: For the purposes of this guide, Option_1 (Node Locked), Option_2 (USB Dongle), and Community licenses are referred to as "static" licenses. Option_3 (Floating) licenses are referred to as "floating" licenses.
If you have any problems with your Xpress license, please refer to the sections on Troubleshooting Licensing Issues, and Licensing Error Messages and Suggested Resolutions. These sections also tell you what information you must supply to FICO Support if you cannot resolve the problem on your own.
Community License
The Community license enables development, modeling, and deployment of the industry leading FICO Xpress Optimization software, free of charge. It can be enabled during installation on Windows; it is automatically enabled during installation on macOS. The solvers in the Community license are limited in problem size. In this edition, the sum of the number of rows (constraints) and columns (variables) is restricted to 5000 for linear and mixed-integer problems, and is restricted to 200 for quadratic and general nonlinear problems. In addition, the number of nonlinear tokens (measure of the complexity for nonlinear expressions) is restricted to 1000, and the number of user functions (black-box optimization) is restricted to 1. You can unlock these capabilities by purchasing and installing a full license.
Obtaining a Full License File
You can obtain a license file, xpauth.xpr, from FICO Sales (or your Xpress supplier). The full license file removes the problem size limits imposed by a Community license. This applies to both new users and users upgrading from earlier releases. The full license file removes the restrictions imposed on problem size by a Community license. License files are generated using information from the output from the Xpress Host ID tool. If you are requesting a static license, run the tool using the following procedure on the machine that will host the installation; For a floating license, follow the steps to run the tool on the server.
- Using Microsoft Windows, you can run this tool from the Start menu, or by browsing in Windows Explorer to navigate to the <installationdir>\bin folder and double clicking xphostid.exe.
- If you use Unix, the tool is installed in the <installationdir>\bin folder as xphostid.
If you are upgrading from an earlier release, you must also supply their ASSC (support) reference number.
A license authorizes the use of all minor releases within a major release. For example, a license file for Xpress 8.4 authorizes the installation of all 8.4 minor releases (8.4.1, 8.4.2, and so forth). A new license file is required for a new major release such as Xpress 8.5.
Downloading the Installation Packages
To install Xpress, use the installer packages available from the downloads area of the FICO Xpress website. When downloading a new release, make sure that you pick the correct installer for your system and license. For example, if you want to use a Linux 64-bit Xpress, make sure this is the package you download (and not, for example, Linux 32-bit).
There are three types of installer;
- an InstallShield Windows version (Windows 32-bit, 64-bit)
- an install script version for all the Linux and Unix installers, and
- a DMG file for macOS.
To install an Xpress patch rather than a full Xpress installation, see the section Patch Installation.
Installing Xpress on Microsoft Windows
Use the Microsoft Windows InstallShield installers, which are contained and run from the self-extracting zip files downloaded from the FICO Xpress website.
Installation Prerequisites for Windows Installation
There are no prerequisites for Windows installations.
- To install the software, double-click the left mouse button on the file you downloaded; this causes the self-extracting zip file to display the following dialog:
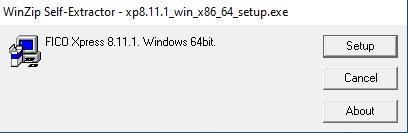
- Click Setup and wait a few moments for the files to be prepared and the installer to run. Once the files have been extracted from the package, the InstallShield installer displays the following window:
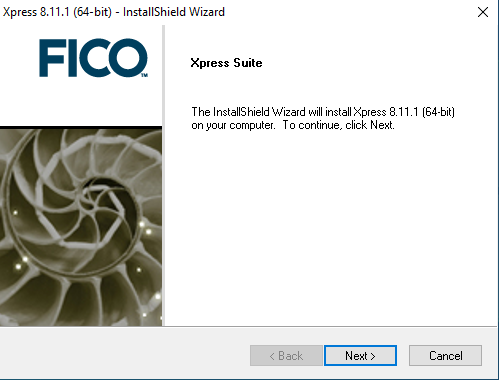
- Click Next to continue with the installation. Click Back if you want to return to the previous screen.
- Next you will be presented with the Xpress licensing agreement as shown below:
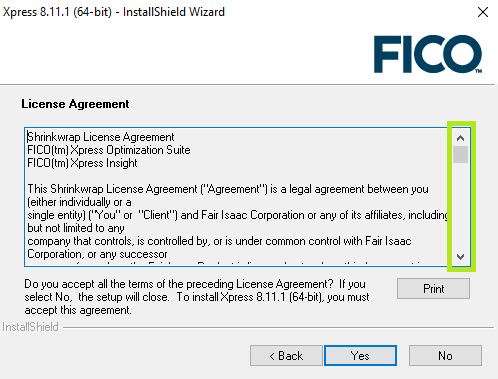
It is important that you read this agreement and make sure that you agree to its terms and conditions. Use the scroll bar (highlighted in green) to read the complete agreement. Click Print to print the agreement text. - Click Yes if you agree with the terms. (If you click No, the installer will automatically close.)
- Accept the default installation location (or navigate to the desired location) then select what type of license you wish to use:
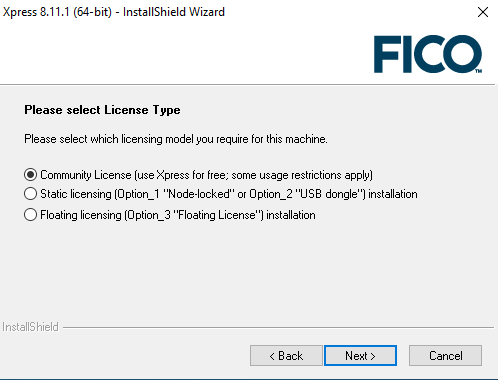
- Community License: Choose this to use the software with the free FICO Xpress Community License for academic and commercial use. The capacity limitations previously listed in Community License apply. The software will install for the local machine only. See Installing the Community License to continue the installation.
- Static Licensing: Choose this to use the software with a paid or evaluation license. The software will install for the local machine only. Click Next. See Installing a Static License to continue the installation.
Note that if you select the Static licensing option and plan on using a dongle to license Xpress, you will be able to move the dongle between machines, but only one machine at a time can access the software. - Floating Licensing: Choose this to use the software with a paid license. The software will install for the current network. Click Next. See Installing a Floating License to continue the installation.
Installing the Community License
- Select where you want the software installed. The default location of C:\xpressmp is suitable for most installations, unless you already have a folder on your C drive named xpressmp, or if you do not have permission to install software to the default location.
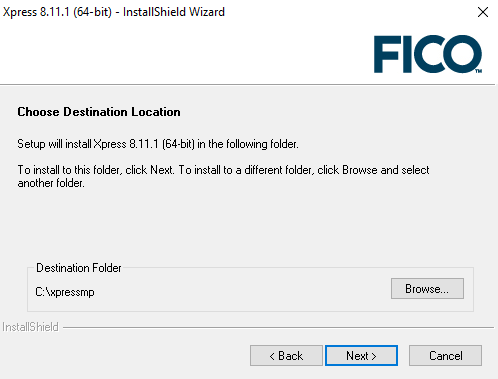
- Click Next.
- Specify whether you want to install the Xpress Kalis constraint programming add-on. This add-on can be used within the Mosel modeling environment. The default option is to install this add-on, but you must have a license which allows its use in order to use the Kalis functionality. If you select to install this option, you must agree to the Artelys Kalis terms and conditions.
Click Install.
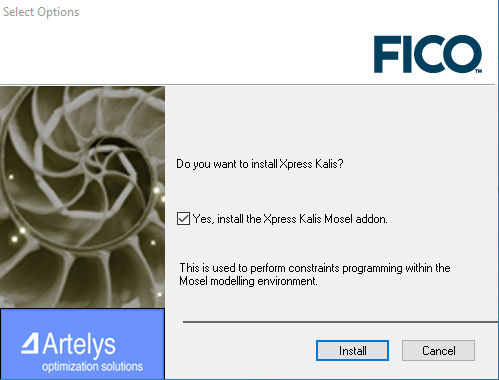
Note: If you chose to install Kalis, you will need to agree to the Xpress-Kalis Software Licence Agreement to continue.
The software is now ready to install. Click Next in the final installer window to begin the process. This may take a few minutes.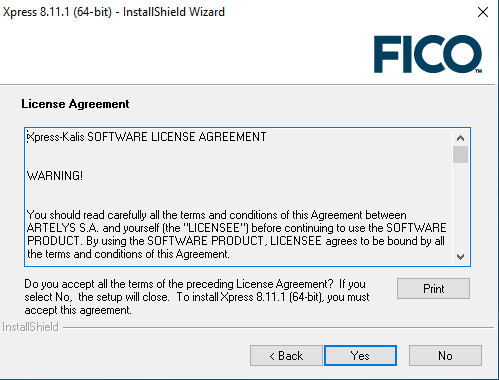
Click Yes to accept.
Installing a Static License
- Select where you want the software installed. The default location of C:\xpressmp is suitable for most installations, unless you already have a folder on your C drive named xpressmp, or if you do not have permission to install software to the default location.
- Click Next.
- At this point in the installation, you can specify whether you intend to use dongles as your licensing key. (Dongles are small USB objects that look similar to a USB memory stick.) Dongles can be used if you want to use Xpress on multiple machines, running the software on one machine at a time. This option is useful when you do not want to lock the license to one particular computer but rather to one particular dongle.
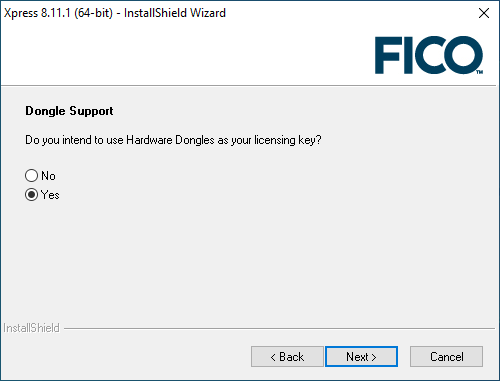
Note: If you do not have Dongle Tools installed, the installer will install them at this point. - Specify whether you want to install the Xpress Kalis constraint programming add-on. This add-on can be used within the Mosel modeling environment. The default option is to install this add-on, but you must have a license which allows its use in order to use the Kalis functionality. If you select to install this option, you must agree to the Artelys Kalis terms and conditions.
Click Install.
Note: If you chose to install Kalis, you will need to agree to the Xpress-Kalis Software Licence Agreement to continue.
The software is now ready to install. Click Next in the final installer window to begin the process. This may take a few minutes.
Click Yes to accept. - To complete the installation, see Post Installation Tasks (For Static or Floating License).
Installing a Floating License
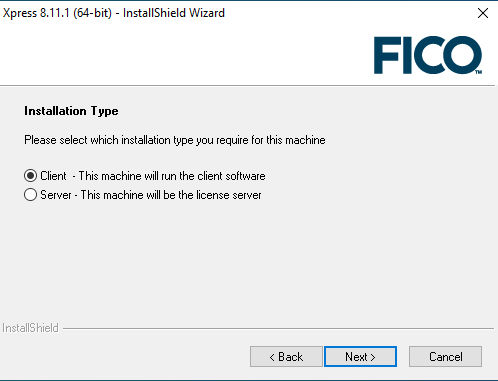
- At this point you will be prompted to specify whether the installation is for the client (the machine that runs the Xpress software and requests licenses from elsewhere), or the server (the machine that runs the license manager and grants or refuses licenses to client machines). For more information see FICO Xpress Licensing.
Make your selection and click Next.
- Select where you want the software installed. The default location of C:\xpressmp is suitable for most installations, unless you already have a folder on your C drive named xpressmp, or if you do not have permission to install software to the default location.
- Click Next.
- If you selected to install a Client:
- You will see the screen to enter the licence server location. For the installer to fully setup your configuration, it needs to know from which server to make license requests. If you do not know what the server is called, then ask your system administrator for the name of the FICO Xpress license server.
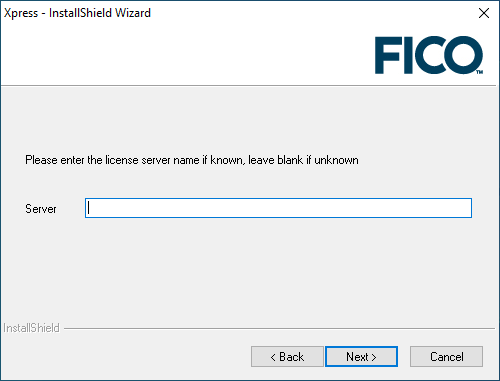
If the name of the server is unknown, but you would like to continue with the installation, leave Server empty and click Next. This creates a license file with an empty field for the server name. Once the server name is known, you can open the license file (located in <installationdir>\bin) with any text file editor and type the server name between the quotes in the line use_server server="". - Specify whether you want to install the Xpress Kalis constraint programming add-on. This add-on can be used within the Mosel modeling environment. The default option is to install this add-on, but you must have a license which allows its use in order to use the Kalis functionality. If you select to install this option, you must agree to the Artelys Kalis terms and conditions.
Click Install.
Note: If you chose to install Kalis, you will need to agree to the Xpress-Kalis Software Licence Agreement to continue.
The software is now ready to install. Click Next in the final installer window to begin the process. This may take a few minutes.
Click Yes to accept.
- You will see the screen to enter the licence server location. For the installer to fully setup your configuration, it needs to know from which server to make license requests. If you do not know what the server is called, then ask your system administrator for the name of the FICO Xpress license server.
- If you selected to install a Server:
- you can specify whether you intend to use dongles as your licensing key. (Dongles are small USB objects that look similar to a USB memory stick.) Dongles can be used if you want to use Xpress on multiple machines, running the software on one machine at a time. This option is useful when you do not want to lock the license to one particular computer but rather to one particular dongle.
Note: If you do not have Dongle Tools installed, the installer will install them at this point. - Click Yes if you want the XPserver license manager to be run as a Windows service. (This means that the license server will be started automatically in the background, which is often the easiest and best way to run the license manager.)
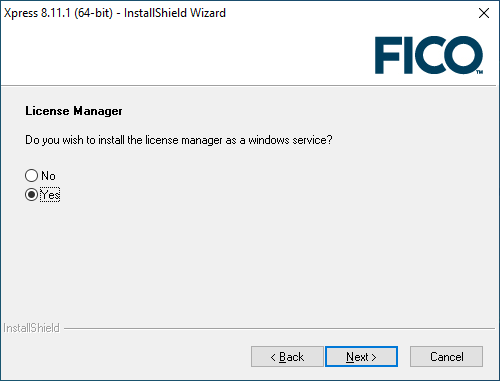
You can also start the license manager as a standard program by running the runlmgr.bat file. For more information see FICO Xpress Licensing. - Click Next.
- Specify whether you want to install the Xpress Kalis constraint programming add-on. This add-on can be used within the Mosel modeling environment. The default option is to install this add-on, but you must have a license which allows its use in order to use the Kalis functionality. If you select to install this option, you must agree to the Artelys Kalis terms and conditions.
Click Install.
Note: If you chose to install Kalis, you will need to agree to the Xpress-Kalis Software Licence Agreement to continue.
The software is now ready to install. Click Next in the final installer window to begin the process. This may take a few minutes.
Click Yes to accept. - To complete the installation, see Post Installation Tasks (For Static or Floating License).
- you can specify whether you intend to use dongles as your licensing key. (Dongles are small USB objects that look similar to a USB memory stick.) Dongles can be used if you want to use Xpress on multiple machines, running the software on one machine at a time. This option is useful when you do not want to lock the license to one particular computer but rather to one particular dongle.
Post Installation Tasks (For Static or Floating License)
- After the software has installed, you will be prompted to point to the license file and the environment variables must be set.
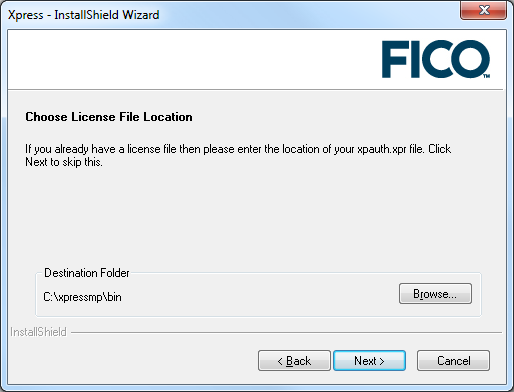
- If you have a license file from FICO Support, click Browse and enter the folder in which the license file (xpauth.xpr) is located. Click Next.
- If you do not have a license file from FICO Support, you can continue; however the license file created in the Xpress installation directory will not be a valid file, just a temporary placeholder until you have a valid license.
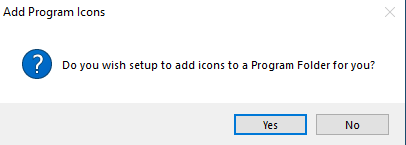
- Click Yes if you want to have the Xpress software added as an option on the Windows Start menu.
You have now successfully installed Xpress.
Note: If the installer fails to function correctly then the software can be installed manually. See Manual Installation for details.
Installation on Linux or Unix
To install Xpress on Linux and Unix variants, use the install script contained within the downloaded tar archive file. You must untar the required files from the downloaded file. As such, it is recommended that you not perform this task from your base directory.
Prerequisites for Linux Installations
Note: If you have an Xpress license, it is recommended that you make a note of the full directory path that contains the file (xpauth.xpr) before you begin installation since you will need this information.
- To extract the files from the tar archive and start the installation script, enter the following commands. (For this example the installation is for an 9.3 Linux 64-bit version; as such, your tar file may have a slightly different name depending on the Xpress version and system on which you are installing.)
tar xf xp9.3.0_linux_x86_64_setup.tar
cd xp9.3.0_linux_x86_64_setup/
./install.sh
After script start up, you will be prompted to answer a series of questions to set up the installation. (You can exit the installation process at any time by pressing the Ctrl and c keys at the same time.) - First, the license agreement is displayed. This can be scrolled through quickly using the Space bar key, or scrolled through slowly using the up and down arrow keys or Enter. Pressing q stops the display of the licensing agreement, at which point you will be asked if you agree to its terms. Press n or y. If you don't accept the license, the installer will exit.
- Specify the type of licensing you wish to use: choose from community (free FICO Xpress Community License for academic and commercial use; the capacity limitations previously listed in Community License apply), static (one computer, or a dongle for a non-server installation) or floating. Also note the following when responding to the prompts:
- In this and all of the other installation questions, valid options are visible in the question text surrounded by square brackets. For example, at this point there are three options: (c)ommunity or (s)tatic or (f)loating. Therefore valid entries are c or s or f.
- When the question requires a yes/no answer, you must type y or n.
- When entering a directory path, type the full path, or press Enter to accept the offered default path.
- If you opted to install a floating license, you will be prompted to indicate whether you want a (s)erver or a (c)lient installation. If you will be connecting to another computer (or another XPserver Xpress license manager on the same machine) then enter c; if you want to make this machine the license server then enter s.
- Determine where to install the software: The default is /opt/xpressmp. Press Enter to accept the default. To install to a different location, enter the full path, making sure to use forward slashes "/". You may enter the relative path if you wish, but this may affect how the environment variables are set later in the installation process. The supported method is to enter the full path.
- You will be prompted to select which components you wish to install. Answer y or n. Default is to install the FICO Xpress Mosel, FICO Xpress commandline interface, FICO Xpress Optimizer interfaces, FICO Xpress developer libraries and headers, and Examples components. FICO Xpress Kalis is not selected to be installed by default.
- Using the Xpress Kalis constraint programming engine: this is an optional component for use in the Mosel modeling environment. It requires the relevant licensing option in order to authorize its use; however, anyone can install the add-on provided they accept the terms and conditions.
If you select to install the Kalis component, the Kalis licensing agreement is displayed. Controls are the same as above. Press n or y to reject or accept. If you don't agree to the license, the installation of the Kalis components will be skipped. - Add Xpress installation paths to your .bashrc file: by doing this, Xpress command-line tools can be accessed from any Bourne shell (bash) you create. If not, you will have to manually source the xpvars.sh file to use Xpress tools. Press n or y.
- License file: you will be prompted to indicate whether you have an Xpress license file from FICO Support.
- If you do not have a license, enter n. At this point, you can stop the installation in order to obtain the license file from FICO Support and then perform the installation once you have it. Or you can continue with the installation and get the license file at a later date. If you choose the latter option, you will need to place the license file in the bin directory of your Xpress installation. For instance, in the preceding example, (/opt/xpressmp) you would copy the xpauth.xpr license file in to the /opt/xpressmp/bin directory.
- If you indicated earlier that you have an Xpress license and provided its location, you will be prompted whether you want to copy the license file to the default directory (which is /opt/xpressmp/bin for this example). This is the default option.
- If you decide not to use the default location for the Xpress license, Xpress will still work correctly; however you should make a careful note of where the license file is stored in case it requires updating at a later date.
- Once installation is complete, the location you have set for the license file will be stored in the XPAUTH_PATH environment variable.
- If you indicated earlier that you were installing a floating client, you will now be prompted for the name of your license server. If you know the name, enter it now. If you do not know the server name, press Enter and make a note of the onscreen instructions for entering the server name at a later date. (You can alter the server name in the xpauth.xpr license file using any text editor, such as Emacs or Vi.)
- On completion, the installer generates two script files, one for the Bourne shell (xpvars.sh) and another for the C shell (xpvars.csh). These scripts should be run, as detailed in the installer output, to set up the shell environment so that Xpress runs correctly. Add them to any user profiles or service startup scripts that will be making use of Xpress.
- If you need to set any custom environment variables for Xpress (in the Bourne shell) you can create a file called xpvars.local.sh alongside the generated xpvars.sh file and export custom environment variables from this script.
- If you did not have your license file while performing the installation, you will need to set the XPAUTH_PATH environment variable to point to it once you do have it. The instructions for doing this from the command line are described within the installer output.
- If you want to add the change to XPAUTH_PATH to a more permanent script that can be run whenever the shell is opened, then the best option would be to edit the relevant xpvars script in the bin directory of your Xpress installation. You can edit these files with any Linux/Unix text editor by altering the line relating to the XPAUTH_PATH environment variable (since this is the location of the license file).
- If you indicated earlier that you were installing a floating server installation, the install script attempts to start the XPserver license manager.
- If you do not have a server license, then an error message is displayed. If it starts successfully, then any log messages from it will be output in to the xpress.log file. By default the xpress.log file is written to /var/tmp/xpress.log. For more information, see FICO Xpress Licensing.
- The Optimizer solver console has a dependency on libncurses.so.5 on Linux platforms. This library may not be installed by default in your Linux distribution. If you need to use the Optimizer console program, you may need to install libncurses 5 using your package manager.
Once the environment variables have been set using the script and a valid license file is present, then the Xpress software is ready to use.
Note: Previous releases of Xpress used the XPRESS environment variable to locate the license file. This is now deprecated in favour of the XPAUTH_PATH environment variable. When upgrading, please update any existing user scripts which set XPRESS so that they instead set XPAUTH_PATH.
Automated installation on Linux or Unix
As well as the guided installation detailed in the previous section you can also use the Xpress installation script as an automated installer by providing command-line options.
To get a list of the available options run:
./install.sh -h
You can specify as many options as you like, if there are any required options missing you will be prompted for these with interactive prompts. If you require the installation to be fully automated make sure you supply all the necessary options so that the interactive prompts do not appear.
When you pass the --no-interactive flag, defaults are applied for any missed options. If the non-interactive installer needs a choice by the user, for example for the license method, it will fail with a message.By passing the --accept-xpress-license or --accept-kalis-license, you agree to their terms and conditions respectively.
Here is an example of a fully automated installation assuming you are in a directory containing the Xpress tar archive and a valid xpauth.xpr license file:
mkdir xp930
tar xf xp9.3.0_linux_x86_64_setup.tar -C xp930/
pushd xp930/xp9.3.0_linux_x86_64_setup/
./install.sh --no-interactive --license-type static --components full --install-path ~/tmp2/xpressmp --xpauth-path ../.. --accept-xpress-license --accept-kalis-license
popd
Installation on macOS
The macOS application is downloaded in a DMG file.
- If you have Xpress installed, back up any existing Xpress licence file, then open the Applications folder. Right click on the FICO Xpress folder and select Move to Trash to uninstall.
- Double-click the downloaded DMG file to display the license agreement.
- Click Agree to continue the installation. A Finder window is displayed, showing the application and a shortcut to your Applications folder.
- Drag the FICO Xpress icon to your Applications folder to install the application.
- The FICO Xpress folder includes a copy of Xpress Workbench that provides direct support for the authoring, editing, executing and debugging of Xpress Mosel models and FICO Xpress Solutions. You can create a shortcut to the Xpress Workbench application by opening the Applications > FICO Xpress folder and dragging the Workbench icon to the Dock.
- Optionally, copy the FICO Xpress Examples folder, that contains a range of useful resources including code examples, to your preferred location and unzip it.
- When the installation is complete, unmount the DMG file. Ctrl-click in the Finder window and select Eject "FICO Xpress Installer". You can then delete the DMG file
- Finally, create a new folder in <HOME>/Documents/ named FICO Xpress Config and copy the license file to it.
Environment variables
To use the command-line tools, certain environment variables need updating. At a console or in a shell script, enter
. /Applications/FICO\ Xpress/xpressmp/bin/xpvars.sh
and the variables will be set.
Note: The backslash (\) between "FICO" and "Xpress" is needed to escape the space character. If you use quoting and auto-completion at the macOS console by pressing TAB, the closing slash will be added outside the quotes and TAB-completing further will automatically undo the quoting. This means;
. "/Applications/FICO
will autocomplete to;
. "/Applications/FICO Xpress"/
Therefore, use backslash escape instead.
. /Applications/FICO\ Xpress/xpressmp
Manual Installation
In the unlikely event that the provided installers fail to function correctly, the software can be extracted manually.
To perform a manual installation on Windows, you must have a program capable of uncompressing zip files. WinZip or WinRar are suitable, although any program with this functionality should work.
Unix and Linux variants should by default contain the necessary programs to unzip and extract from the tar archives. If you do not have an extraction program, you will need to install one. If this is the case and your previous attempt at automatic installation using the install script failed, then the lack of an extraction program may be the cause. In this case, install the required tools and attempt an automatic installation again.
The differences between the automatic and manual installation methods are as follows:
- Files are not installed selectively as the whole archive will be uncompressed.
- Not all environment variables are automatically set.
- The dongle driver installation will not be run automatically (Windows).
- The file shortcuts will not automatically be added to the Start menu (Windows).
- The XPserver license manager will not be automatically configured to run as a service.
Manual Microsoft Windows Installation
Should the InstallShield installation fail, the files may be extracted using any program capable of reading and extracting from zip files as follows:
- Rename the downloaded installation file extension from .exe to .zip.
- Extract the files from the zip file to the folder from where you want to install.
- Copy your license file in to the bin folder of the installation directory. If you are working with a Community License, rename or copy the provided file community-xpauth.xpr to xpauth.xpr.
- Read the license.txt file in your installation folder and make sure you agree with the terms and conditions. (If you do not agree, then cancel the installation and delete the software.)
- Add the XPRESSDIR environment variable and point towards the xpressmp folder of the installation directory. You can set this by going to the Start menu » Settings » Control Panel » System » Advanced » Environment Variables, and creating a new environment variable. Use the full path.
- Add the path %XPRESSDIR%/bin to the PATH environment variable. (This allows the system to find the relevant Xpress libraries and executables.)
- To add links to the programs on the Start menu, select Start menu » Settings » Taskbar and Start Menu. Click on the Start Menu tab and click Customize.
Click Add. The Microsoft Windows wizard will display so that you can add the programs to the Start menu. You may want to add optimizer.exe and xpworkbench.exe as basic links, although a number of other executables are available. (See the bin folder in the installation directory.)
If you installing a floating server license, you need only add links to XPserver.exe, or the configuration batch file runlmgr.bat. - If you installing a floating server license, you can delete all files and folders except the following:
- xpserver.exe in the bin folder.
- xphostid.exe in the bin folder.
- xplicstat.exe in the bin folder.
- xprl.dll in the bin folder.
- libcrypto-3-x64.dll in the bin folder.
- libssl-3-x64.dll in the bin folder.
- runlmgr.bat in the bin folder.
- The tools folder, if you require dongle licensing, from the main Xpress folder.
- License.txt from the main Xpress folder.
- The licensing folder from the docs folder.
- If you are going to use dongles for licensing, then install the dongle drivers found in the tools\dongle\hasp directory of your Xpress folder. Use a Windows console as it requires the addition of command-line arguments. You can open a Windows console by running cmd using the Start » Run menu. See Dongle Licenses (for Microsoft Windows Machines) for more information.
- Set up the XPserver license manager. See FICO Xpress Licensing for instructions.
Manual Linux/Unix Installation
As mentioned previously, if the installation fails, it is likely that there was a problem using the standard zip and tar programs. If this is not the case, then you can manually install the software by following these steps:
- If you have not done so, untar the downloaded installer (if you have attempted to install via the automated install script then you have already performed this step). This command extracts the files from the tar archive:
tar xf name_of_downloaded_installer.tar
- The extracted files include the installation script install.sh. Move the .gz file to the directory where you want to install the software.
Decompress the .gz file using the following command:gunzip name_of_gz_file.gz
- The preceding command extracts another tar archive which itself contains the installation files and may be unarchived using the following:
tar xf name_of_new_tar_file.tar
- The installation directory should now contain several directories of files and several license and html files. Read the license files and make sure you agree with the terms and conditions; if you do not agree to them, delete the software and discontinue the installation.
- Copy your xpauth.xpr license file to the bin directory of the Xpress installation. If you are working with a Community License, rename or copy the provided file community-xpauth.xpr to xpauth.xpr.
- Set the relevant environment variables so that your system can find the Xpress executables, runtime libraries and license file. For example, on a Linux system using the C shell:
setenv XPRESSDIR your_xpress_install_directory
setenv PATH $XPRESSDIR/bin:$PATH
setenv LD_LIBRARY_PATH $XPRESSDIR/lib:$LD_LIBRARY_PATH
setenv CLASSPATH $XPRESSDIR/lib/xprs.jar:$CLASSPATH
setenv CLASSPATH $XPRESSDIR/lib/xprb.jar:$CLASSPATH
setenv CLASSPATH $XPRESSDIR/lib/xprm.jar:$CLASSPATH
setenv XPAUTH_PATH $XPRESSDIR/bin/xpauth.xpr
The name of the environment variable used to find shared libraries varies by system; on Linux and Solaris it's usually LD_LIBRARY_PATH and on macOS you should use DYLD_LIBRARY_PATH instead. If unsure, consult your system administrator.
You may find it useful to create a small shell script that sets these variables, or to set them in a script that runs automatically as you log in. - If you plan to use the xssh: protocol to connect to a Mosel optimization service running from this installation of FICO Xpress, execute the following commands to generate a unique machine key:
cd $XPRESSDIR/bin
./xprmsrv -key new
- If you are performing a Linux installation and require the use of dongles for licensing, install the dongle drivers now. See Dongle Licenses (for Linux Machines).
- If you are installing a floating server license, you only need a few of the files and can remove the rest. You must keep the following files in order for the XPserver license manager to function correctly:
- xpserver in the bin directory.
- xplicstat in the bin directory.
- runlmgr in the bin directory.
- All files which begin with libxprl in the lib directory.
- libcrypto.so.3 (libcrypto.3.dylib on macOS) in the lib/thirdparty directory.
- libssl.so.3 (libssl.3.dylib on macOS) in the lib/thirdparty directory.
- The licensing directory in the docs directory.
- xphostid in the utils directory.
- license.txt from the main Xpress installation directory.
- To setup the XPserver license manager, follow the instructions as described in FICO Xpress Licensing.
Patch Installation
Patch, or maintenance, releases are releases that only include updated files for parts of the Xpress software. They may be released to fix a particular bug, improve performance or to add a new feature. The larger maintenance releases can be downloaded from the FICO Xpress website. They are bundled with installers and can be installed by themselves. The patch releases (which are often individual files or programs) are usually found on the FICO Xpress download site and must be applied to a previous installation of FICO Xpress.
If you have reported an issue with the software and a fix is now available, you are usually notified by email from the Support system that the fix is available to download using the ftp site and where on the site to download the fix.
Windows Patch Installation
- Using your zip file extraction program (such as WinZip or WinRar) extract the patch files. In most cases, these will be replacements for library or executable files found in the bin folder of the Xpress installation, or the .dso files found in the dso folder of the installation.
- If you know where the replacement file(s) should be copied, copy them to the correct destination, overwriting the older file. (You can always rename the older file if you still want access to it.)
If you are uncertain where the new file should go, search from the Xpress installation directory for the name of the file. To do this, right-click on the Xpress installation folder and select Search from the menu. Enter the name of the file you wish to replace in the All or part of the file name box and click Search. The resulting list indicates where in the Xpress installation the file can be found.
After the patch is placed in the correct location in the installation, the software may be run as normal and the updated files will be automatically used.
Note: If you plan to install multiple copies of Xpress on one system, make sure that the folder you are applying the patch to is the correct one and that the XPRESS, PATH and MOSEL_DSO environment variables point towards the correct folders.
Linux/Unix Patch Installation
- Using your gunzip file extraction and tar archive programs, extract the patch files. On most systems this can be achieved using:
gunzip patchfilename.tar.gz
tar xf patchfilename.tar
In most cases, these will be replacements for library or executable files are found in the lib and bin folders of the Xpress installation, or the .dso files found in the dso folder of the installation. - If you know where the replacement file(s) should be copied, copy them to the correct destination, overwriting the older file. (You can always rename the older file if you still want to have access to it.)
If you are uncertain where the new file should go, search on the Xpress installation directory for the name of the file. You can do this using the find command from the Xpress installation directory:find . -name name_of_file_to_be_replaced
- Running the preceding command results in generating a list of files with matching names. You may find that if you are searching for a particular minor revision of a file, such as libxprs.so.18.10.05, that no matching name is found. This is to be expected as the Linux/Unix library files are named as per their revision and contain symbolic links (libxprs.so and libxprs.so.18.10 in this case) which point to the actual library file.
After the patch is placed in the correct location in the installation, the software can be run as normal and the updated files will be automatically used.
If you are attempting to install multiple copies of Xpress on one system, ensure that the folder you are applying the patch to is the correct one and that the XPAUTH_PATH, XPRESSDIR, PATH, LIBPATH (or SHLIB_PATH or LD_LIBRARY_PATH, depending on the system used) and MOSEL_DSO environment variables point towards the correct folder.
macOS Patch Installation
macOS patch releases are provided as a DMG file and contain a complete Xpress installation. Please refer to the instructions at Installation on macOS.
Installation of the R and Python packages
The Xpress Optimizer can also be installed as an independent module for languages such as R and Python. The following subsections describe their installation process in detail. We refer the reader to the corresponding reference manuals for a description of the usage of these interfaces.
Installation of the R package
The Xpress R Interface is contained as an archive (xpress.tar.gz under Linux and macOS, xpress.zip or xpress.tar.gz under Windows) in the installer of the FICO Xpress Optimizer in the R/ subdirectory. It can be installed into an R environment via the R command install.packages. Please refer to the file R/INSTALL.txt for platform-specific installation instructions.
Installation of the Python module
The Xpress Python module can be installed from two Python repositories: The Python Package Index (PyPI) and the Conda repository. Installing the Xpress Python interface does not require installation of the whole Xpress suite, as all necessary libraries are provided.
The install comes with a copy of the Community license, which allows for solving problems with a restricted number of variables and constraints (see Section Community License for details). If you already have an Xpress license, please make sure to set the XPAUTH_PATH environment variable to the full path to the license file, xpauth.xpr.
The manual is located in the xpress/doc subdirectory of the Python installation folder, and its location can be identified by invoking the xpress.manual() function.
For installation using the PyPI server, run the following on a command line:
pip install xpress
Packages for Python 3.8 to 3.12 are available, for Windows, Linux, and MacOS. The package contains the Python interface module, its documentation in PDF format, the Xpress Optimizer's libraries, various examples of use, and a copy of the Community license (see https://content.fico.com/xpress-optimization-community-license). Online documentation can be viewed at the FICO Xpress Optimization Help page.
The above command installs the latest version of the Xpress Python module. Earlier versions of the module can be installed by appending a "==VERSION" string to the module name, for instance
pip install xpress==8.11.2
A Conda package is available for download with the following command:
conda install -c fico-xpress xpress
The content of the Conda package is the same as that of the PyPI package. Similar to the PyPI package, Conda packages for Python 3.8 to 3.12 are available, for Windows, Linux, and MacOS. Similar to PyPI, the Conda installer fetches the latest version of the package but allows for installing earlier versions as in the following example (note that the Conda installer only uses a single "="):
conda install -c fico-xpress xpress=8.11.3
© 2001-2024 Fair Isaac Corporation. All rights reserved. This documentation is the property of Fair Isaac Corporation (“FICO”). Receipt or possession of this documentation does not convey rights to disclose, reproduce, make derivative works, use, or allow others to use it except solely for internal evaluation purposes to determine whether to purchase a license to the software described in this documentation, or as otherwise set forth in a written software license agreement between you and FICO (or a FICO affiliate). Use of this documentation and the software described in it must conform strictly to the foregoing permitted uses, and no other use is permitted.